
The Qt Team recently posted that Qt will now be officially supporting the PySide2 project, which they are calling “Qt for Python”. It will be a complete port of the original PySide, which only supported Qt 4. PySide2 supports Qt 5. Qt for Python will have the following license types: GPL, LGPL and commercial.
PySide2 supports Python 2.7 as well as Python 3.4 – 3.6. There are snapshot wheel builds available here.Let’s say we downloaded the Windows Python wheel. To install it, you can use pip like this:
python -m pip install PySide2-5.11.0a1-5.11.0-cp36-cp36m-win_amd64.whl
Once you have PySide2 installed, we can get started by looking at a really simple example:
import sys
from PySide2.QtWidgets import QApplication, QLabel

if __name__ == '__main__':
    app = QApplication([])
    label = QLabel("Qt for Python!")
    label.show()
    sys.exit(app.exec_())
This code will create our application object (QApplication) and a QLabel to go on it. When you run app.exec_(), you start PySide2’s event loop. Since we do not specify a size for the label or the application, the size of the application defaults to be just large enough to fit the label on-screen:
![]()
That’s kind of a boring example, so let’s look at how we might connect an event to a button.
Adding Event Handling
Event handling in PySide2 uses the concept of Signals and Slots underneath the covers. You can read about how that works in their documentation. Let’s take a look at how we might set up a button event:
import sys
from PySide2.QtWidgets import QApplication, QLabel, QLineEdit
from PySide2.QtWidgets import QDialog, QPushButton, QVBoxLayout

class Form(QDialog):
    """"""

    def __init__(self, parent=None):
        """Constructor"""
        super(Form, self).__init__(parent)

        self.edit = QLineEdit("What's up?")
        self.button = QPushButton("Print to stdout")

        layout = QVBoxLayout()
        layout.addWidget(self.edit)
        layout.addWidget(self.button)

        self.setLayout(layout)

        self.button.clicked.connect(self.greetings)


    def greetings(self):
        """"""
        text = self.edit.text()
        print('Contents of QLineEdit widget: {}'.format(text))

if __name__ == "__main__":
    app = QApplication([])
    form = Form()
    form.show()
    sys.exit(app.exec_())
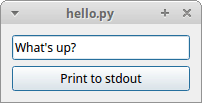
Here we create a text box via the QLineEdit widget along with a button via the QPushButton widget. Then we put both of those widgets inside of a QVBoxLayout, which is a container that will allow you to change the size of the application and have the widgets contained inside of the layout change sizes and position accordingly. In this case, we use a vertically oriented layout, which means that the widgets get “stacked” vertically.
Finally we connect button’s “clicked” signal with the greetings (slot) function. Whenever we click our button, it should call the function we specified. This function will grab the contents of our text box and print it to stdout. Here’s what it looks like when I ran the code:
I think that looks alright, but it’s still not a very interesting looking UI.
Creating a Simple Form
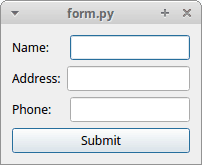
Let’s wrap things up by creating a simple form with PySide2. We won’t hook the form up to anything in this example. It will just be a quick and dirty piece of sample code that shows how you might create a simple form:
import sys

from PySide2.QtWidgets import QDialog, QApplication
from PySide2.QtWidgets import QHBoxLayout, QVBoxLayout
from PySide2.QtWidgets import QLineEdit, QLabel, QPushButton

class Form(QDialog):
    """"""

    def __init__(self, parent=None):
        """Constructor"""
        super(Form, self).__init__(parent)
        main_layout = QVBoxLayout()

        name_layout = QHBoxLayout()
        lbl = QLabel("Name:")
        self.name = QLineEdit("")
        name_layout.addWidget(lbl)
        name_layout.addWidget(self.name)
        name_layout.setSpacing(20)

        add_layout = QHBoxLayout()
        lbl = QLabel("Address:")
        self.address = QLineEdit("")
        add_layout.addWidget(lbl)
        add_layout.addWidget(self.address)

        phone_layout = QHBoxLayout()
        self.phone = QLineEdit("")
        phone_layout.addWidget(QLabel("Phone:"))
        phone_layout.addWidget(self.phone)
        phone_layout.setSpacing(18)

        button = QPushButton('Submit')

        main_layout.addLayout(name_layout, stretch=1)
        main_layout.addLayout(add_layout, stretch=1)
        main_layout.addLayout(phone_layout, stretch=1)
        main_layout.addWidget(button)
        self.setLayout(main_layout)

if __name__ == "__main__":
    app = QApplication([])
    form = Form()
    form.show()
    sys.exit(app.exec_())
In this code, we use several box layouts to arrange the widgets on screen. Namely, we use a QVBoxLayout as our top-level layout and then nest QHBoxLayouts inside of it. You will also note that when we add the QHBoxLayouts, we tell them to stretch when we resize the main widget. The rest of the code is pretty much the same as what you have already seen.
Wrapping Up
I haven’t played around with PySide2 (or PyQt) in a number of years, so it was exciting to see Qt picking this back up again. I think having some competition between PySide2 and PyQt will be a good thing and it might also drive some innovation with other Python UI frameworks. While the developers behind PySide2 don’t have current plans to support mobile platforms, unfortunately, they do seem interested in hearing if that’s something that developers would be interested in. Frankly, I hope a LOT of people chime in and tell them yes because we need other options in the Python mobile UI space.
Anyway, I think this project has a lot of potential and I look forward to seeing how it grows.
Related Reading
- PySide2 Wiki
- Qt for Python is coming to a computer near you
- Snapshot builds of PySide2 as Python wheels