
The PySide GUI toolkit for Python has several standard dialogs and message boxes that you can use as-is. You can also create custom dialogs, but we’ll be saving that for a future article. In this post, we will cover the following dialogs:
- Color Dialog
- File Dialog
- Font Dialog
- Input Dialog
- Print & Print Preview Dialogs
We will also cover PySide’s Message Boxes. All code in this article was tested on Windows 7 Professional with PySide 1.2.2 and Python 2.6.6. Now let’s get to it!
Getting Information with Standard Dialogs
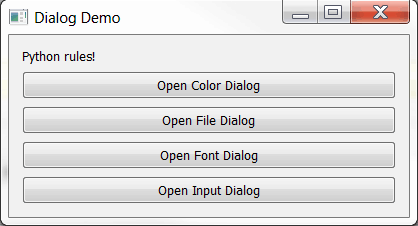
We’ll start off with some code that will show each of the first four dialogs listed above. The other two are more complicated and get their own special demo code. After the code, we’ll take a look at each dialog’s code individually to help understand it.
# stdDialogDemo_pyside.py

from PySide import QtCore, QtGui

########################################################################
class DialogDemo(QtGui.QWidget):
    """"""

    #----------------------------------------------------------------------
    def __init__(self):
        """Constructor"""
        # super(DialogDemo, self).__init__()
        QtGui.QWidget.__init__(self)

        self.label = QtGui.QLabel("Python rules!")

        # create the buttons
        colorDialogBtn = QtGui.QPushButton("Open Color Dialog")
        fileDialogBtn =  QtGui.QPushButton("Open File Dialog")
        self.fontDialogBtn = QtGui.QPushButton("Open Font Dialog")
        inputDlgBtn = QtGui.QPushButton("Open Input Dialog")

        # connect the buttons to the functions (signals to slots)
        colorDialogBtn.clicked.connect(self.openColorDialog)
        fileDialogBtn.clicked.connect(self.openFileDialog)
        self.fontDialogBtn.clicked.connect(self.openFontDialog)
        self.connect(inputDlgBtn, QtCore.SIGNAL("clicked()"), self.openInputDialog)

        # layout widgets
        layout = QtGui.QVBoxLayout()
        layout.addWidget(self.label)
        layout.addWidget(colorDialogBtn)
        layout.addWidget(fileDialogBtn)
        layout.addWidget(self.fontDialogBtn)
        layout.addWidget(inputDlgBtn)
        self.setLayout(layout)

        # set the position and size of the window
        self.setGeometry(100, 100, 400, 100)

        self.setWindowTitle("Dialog Demo")

    #----------------------------------------------------------------------
    def openColorDialog(self):
        """
        Opens the color dialog
        """
        color = QtGui.QColorDialog.getColor()

        if color.isValid():
            print color.name()
            btn = self.sender()
            pal = btn.palette()
            pal.setColor(QtGui.QPalette.Button, color)
            btn.setPalette(pal)
            btn.setAutoFillBackground(True)

            #btn.setStyleSheet("QPushButton {background-color: %s}" % color)

    #----------------------------------------------------------------------
    def openFileDialog(self):
        """
        Opens a file dialog and sets the label to the chosen path
        """
        import os
        path, _ = QtGui.QFileDialog.getOpenFileName(self, "Open File", os.getcwd())
        self.label.setText(path)


    #----------------------------------------------------------------------
    def openDirectoryDialog(self):
        """
        Opens a dialog to allow user to choose a directory
        """
        flags = QtGui.QFileDialog.DontResolveSymlinks | QtGui.QFileDialog.ShowDirsOnly
        d = directory = QtGui.QFileDialog.getExistingDirectory(self,
                                                               "Open Directory",
                                                               os.getcwd(),
                                                               flags)
        self.label.setText(d)

    #----------------------------------------------------------------------
    def openFontDialog(self):
        """
        Open the QFontDialog and set the label's font
        """
        font, ok = QtGui.QFontDialog.getFont()
        if ok:
            self.label.setFont(font)

    #----------------------------------------------------------------------
    def openInputDialog(self):
        """
        Opens the text version of the input dialog
        """
        text, result = QtGui.QInputDialog.getText(self, "I'm a text Input Dialog!",
                                            "What is your favorite programming language?")
        if result:
            print "You love %s!" % text

#----------------------------------------------------------------------
if __name__ == "__main__":
    app = QtGui.QApplication([])
    form = DialogDemo()
    form.show()
    app.exec_()
Well that looks pretty clean and straight-forward. Let’s break it down a bit. You can see at the beginning of the __init__ method that I have commented out an alternate way of initializing the QWidget using Python’s super. You can do it either way and your program will work fine. I just wanted to show you both ways of doing it. You’ll also notice that all this code does is display a QLabel and four QPushButton widgets. We connect the signals (i.e. events) from the buttons to the slots (i.e. event handlers) using two different methods. The first is more “Pythonic” in that it uses dot-notation:
colorDialogBtn.clicked.connect(self.openColorDialog)
The second way (which we use once) is probably the most common way you’ll see it done, but it’s a little harder to understand if you’re just used to Python code:
self.connect(inputDlgBtn, QtCore.SIGNAL("clicked()"), self.openInputDialog)
Both ways of connecting the signals to the slots works. Note that we’re binding the clicked event. This means that when the user clicks the button, it calls the connected method. Now we’ll take a look at each of the dialogs in turn.
The PySide Color Dialog
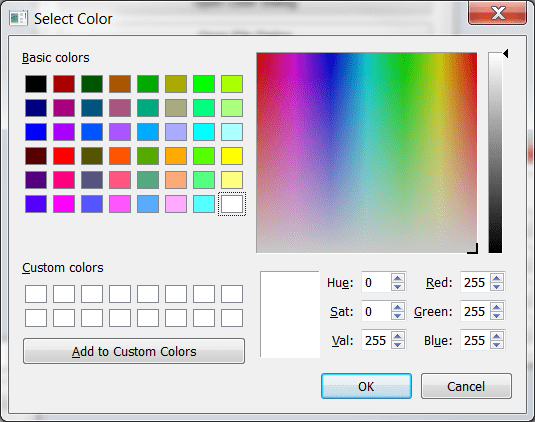
The PySide Color Dialog is a pretty standard color dialog that you’ll see in most simple drawing programs, such as Windows Paint. To create it, we do the following:
#----------------------------------------------------------------------
def openColorDialog(self):
    """
    Opens the color dialog
    """
    color = QtGui.QColorDialog.getColor()

    if color.isValid():
        print color.name()
        btn = self.sender()
        pal = btn.palette()
        pal.setColor(QtGui.QPalette.Button, color)
        btn.setPalette(pal)
        btn.setAutoFillBackground(True)

        #btn.setStyleSheet("QPushButton {background-color: %s}" % color)
Here we call QtGui.QColorDialog.getColor() to return the color chosen by the user and to also instantiate the dialog. If the color chosen is valid, we apply it to our QPushButton. You’ll note that there’s a line commented out at the end of this method. I was told that you can use a type of PySide CSS to change the background color of the button, but I couldn’t figure out the correct way to do it. Some people on the PySide IRC channel said the commented line should work. Others said that it should be just background instead of background-color, but that didn’t work for me either. Even with the Palette method shown here, the background color still doesn’t change. Instead, you’ll only notice a subtle change of color to the outline of the button.
The PySide File Dialog
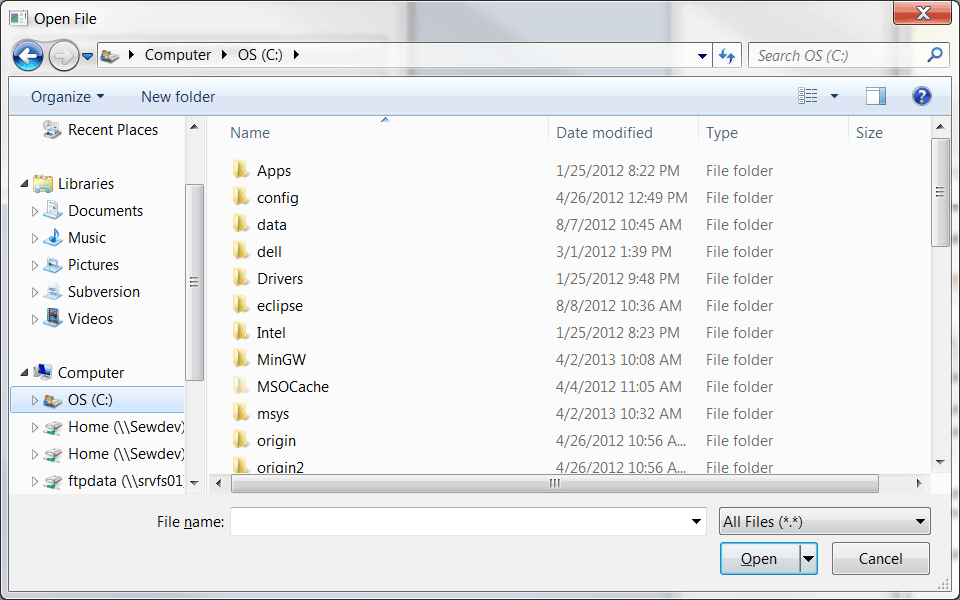
The PySide File Dialog should be familiar to most people as it matches the native file dialog very closely (on Windows at least). Here’s the code to instantiate it:
#----------------------------------------------------------------------
def openFileDialog(self):
    """
    Opens a file dialog and sets the label to the chosen path
    """
    import os
    path, _ = QtGui.QFileDialog.getOpenFileName(self, "Open File", os.getcwd())
    self.label.setText(path)
We use getOpenFileName to return the file path in a tuple that also includes the file type, which in this case is All Files (*.*). We also set our QLabel to the path that was returned. There’s also a method in our main code called openDirectoryDialog that uses the same call signature but instead of getOpenFileName, we use getExistingDirectory. See the example below:
#----------------------------------------------------------------------
def openDirectoryDialog(self):
    """
    Opens a dialog to allow user to choose a directory
    """
    flags = QtGui.QFileDialog.DontResolveSymlinks | QtGui.QFileDialog.ShowDirsOnly
    d = directory = QtGui.QFileDialog.getExistingDirectory(self,
                                                           "Open Directory",
                                                           os.getcwd(),
                                                           flags)
    self.label.setText(d)
As you can see, we had to pass a couple of flags to this dialog to tell it not to resolve symlinks and to only show directories. Finally, there is also a getOpenFileNames method to the QFileDialog that allows the user to choose multiple files from the dialog and return all the selected files. This one is not shown, but operates similarly.
The PySide Font Dialog
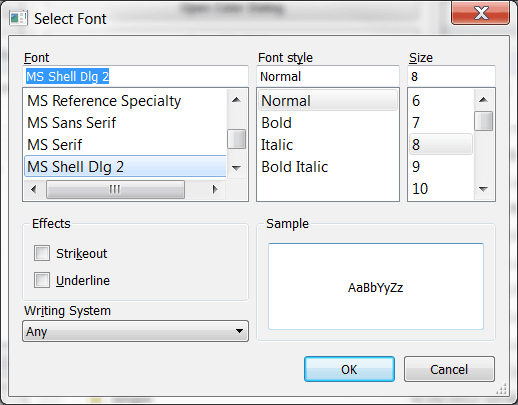
The PySide Font dialog is very similar to the one you’ll see in older versions of Microsoft Office products. Creating the dialog is pretty simple:
#----------------------------------------------------------------------
def openFontDialog(self):
    """
    Open the QFontDialog and set the label's font
    """
    font, ok = QtGui.QFontDialog.getFont()
    if ok:
        self.label.setFont(font)
As you can see, you just create the dialog and call its getFont() method. This returns the chosen font and also whether or not the OK button was pushed. If it was, we reset our QLabel widget with the new font.
The PySide Input Dialog
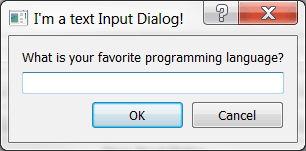
The PySide Input dialog is also pretty simple. However, there are four varieties: Text, Integer, Double and Item. As is fairly obvious, these return text, integers, doubles (i.e. float) and items, which allows the user to choose from a list of items from a combobox. Here we show how to create the text version:
#----------------------------------------------------------------------
def openInputDialog(self):
    """
    Opens the text version of the input dialog
    """
    text, result = QtGui.QInputDialog.getText(self, "I'm a text Input Dialog!",
                                        "What is your favorite programming language?")
    if result:
        print "You love %s!" % text
If you’d like to see examples of the other types of input dialogs, I recommend you see the pyside-examples folder on git, specifically the standarddialogs.py script. You can also see screenshots of all four of these widgets here.
At this point, we’re ready to learn about the two types of print dialogs.
PySide’s Print Dialogs
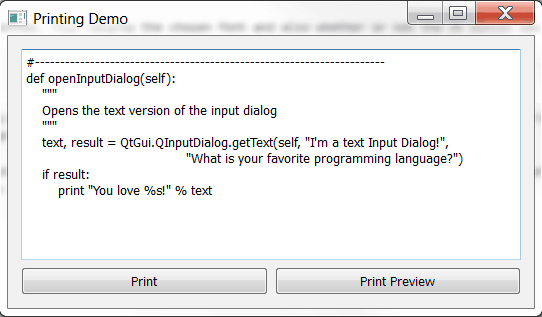
For this demo, we create a simple little window with a QTextEdit to hold some example text and two buttons. We’ll copy and paste the code example from the previous section into this demo app and then press the Print button. Here’s the demo code:
# printDlgDemo.py

from PySide import QtGui, QtCore

########################################################################
class PrinterWindow(QtGui.QWidget):
    """"""

    #----------------------------------------------------------------------
    def __init__(self):
        """Constructor"""
        QtGui.QWidget.__init__(self)
        self.setWindowTitle("Printing Demo")
        self.text_editor = QtGui.QTextEdit(self)

        printButton = QtGui.QPushButton('Print')
        printButton.clicked.connect(self.onPrint)
        printPreviewButton = QtGui.QPushButton('Print Preview')
        printPreviewButton.clicked.connect(self.onPrintPreview)

        btnLayout = QtGui.QHBoxLayout()
        mainLayout = QtGui.QVBoxLayout()

        btnLayout.addWidget(printButton)
        btnLayout.addWidget(printPreviewButton)
        mainLayout.addWidget(self.text_editor)
        mainLayout.addLayout(btnLayout)

        self.setLayout(mainLayout)

    #----------------------------------------------------------------------
    def onPrint(self):
        """
        Create and show the print dialog
        """
        dialog = QtGui.QPrintDialog()
        if dialog.exec_() == QtGui.QDialog.Accepted:
            doc = self.text_editor.document()
            doc.print_(dialog.printer())

    #----------------------------------------------------------------------
    def onPrintPreview(self):
        """
        Create and show a print preview window
        """
        dialog = QtGui.QPrintPreviewDialog()
        dialog.paintRequested.connect(self.text_editor.print_)
        dialog.exec_()

#----------------------------------------------------------------------
if __name__ == "__main__":
    app = QtGui.QApplication([])
    form = PrinterWindow()
    form.show()
    app.exec_()
If you hit the Print button, you should see a dialog similar to the one below (if you’re on Windows 7):
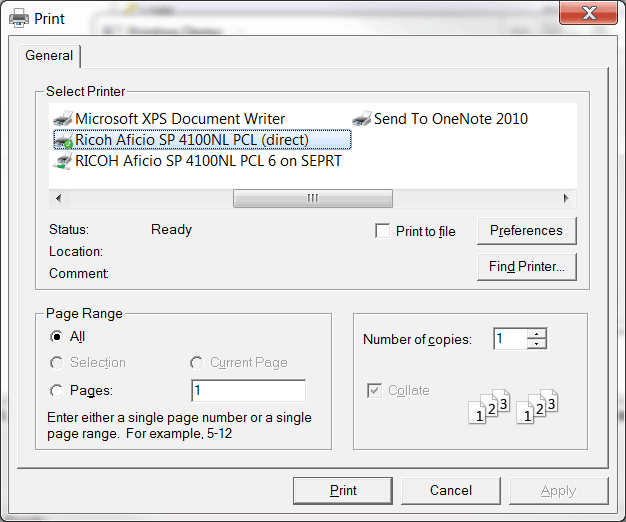
Let’s take a look at the code behind this dialog:
#----------------------------------------------------------------------
def onPrint(self):
    """
    Create and show the print dialog
    """
    dialog = QtGui.QPrintDialog()
    if dialog.exec_() == QtGui.QDialog.Accepted:
        doc = self.text_editor.document()
        doc.print_(dialog.printer())
Here we instantiate the QPrintDialog and we show it by calling its exec_() method. If the user actually hits the Print button, we’ll extract a QTextDocument from the QTextEdit control and then call its print_() method by passing it the printer dialog.
Now let’s do the print preview dialog! Here’s the code from the demo mentioned earlier:
#----------------------------------------------------------------------
def onPrintPreview(self):
    """
    Create and show a print preview window
    """
    dialog = QtGui.QPrintPreviewDialog()
    dialog.paintRequested.connect(self.text_editor.print_)
    dialog.exec_()
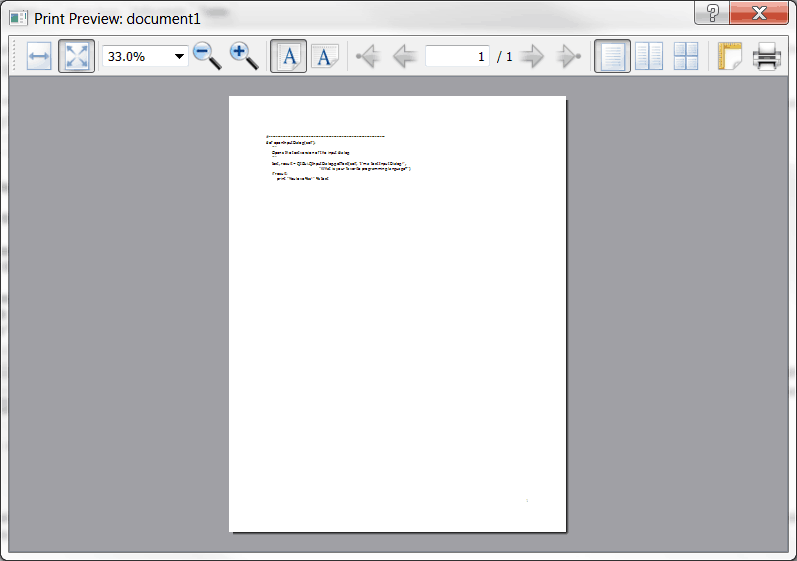
This code is a little simpler than creating the QPrintDialog. Here we just instantiate an instance of QPrintPreviewDialog, tell it we want to connect paintRequested signal to the print_ method of text control. Finally we show the dialog. PySide does the rest and ends up creating a dialog that looks something like this:
You now know how to create both types of PySide’s print dialogs! At this point, we’re ready to move on to message boxes!
PySide’s Message Boxes
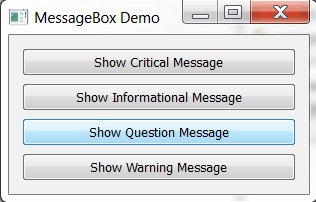
PySide has four Message Boxes based on the QMessageBox widget: critical, information, question and warning. We’re going to take a look at all four. We’ll start out with a full code example that is a demo that can launch any of the 4 message boxes and then we’ll look at each piece as we did in the previous section. Here’s the main program’s source:
from PySide import QtCore, QtGui

########################################################################
class MessageBoxDemo(QtGui.QWidget):
    """"""

    #----------------------------------------------------------------------
    def __init__(self):
        """Constructor"""
        # super(DialogDemo, self).__init__()
        QtGui.QWidget.__init__(self)
        self.setWindowTitle("MessageBox Demo")

        # create buttons
        criticalMsgBtn = QtGui.QPushButton("Show Critical Message")
        criticalMsgBtn.clicked.connect(self.onShowCriticalMessage)

        infoMsgBtn = QtGui.QPushButton("Show Informational Message")
        infoMsgBtn.clicked.connect(self.onShowInformation)

        questionMsgBtn = QtGui.QPushButton("Show Question Message")
        questionMsgBtn.clicked.connect(self.onShowQuestion)

        warningMsgBtn = QtGui.QPushButton("Show Warning Message")
        warningMsgBtn.clicked.connect(self.onShowWarning)

        # layout widgets
        layout = QtGui.QVBoxLayout()
        layout.addWidget(criticalMsgBtn)
        layout.addWidget(infoMsgBtn)
        layout.addWidget(questionMsgBtn)
        layout.addWidget(warningMsgBtn)
        self.setLayout(layout)

        self.setGeometry(100,100,300,100)

    #----------------------------------------------------------------------
    def onShowCriticalMessage(self):
        """
        Show the critical message
        """
        flags = QtGui.QMessageBox.Abort
        flags |= QtGui.QMessageBox.StandardButton.Retry
        flags |= QtGui.QMessageBox.StandardButton.Ignore

        result = QtGui.QMessageBox.critical(self, "CRITICAL ERROR",
                                            "You're trying Perl aren't you?",
                                            flags)
        if result == QtGui.QMessageBox.Abort:
            print "Aborted!"
        elif result == QtGui.QMessageBox.Retry:
            print "Retrying!"
        elif result == QtGui.QMessageBox.Ignore:
            print "Ignoring!"

    #----------------------------------------------------------------------
    def onShowInformation(self):
        """
        Show the information message
        """
        QtGui.QMessageBox.information(self, "Information", "Python rocks!")

    #----------------------------------------------------------------------
    def onShowQuestion(self):
        """
        Show the question message
        """
        flags = QtGui.QMessageBox.StandardButton.Yes
        flags |= QtGui.QMessageBox.StandardButton.No
        question = "Do you really want to work right now?"
        response = QtGui.QMessageBox.question(self, "Question",
                                              question,
                                              flags)
        if response == QtGui.QMessageBox.Yes:
            print "You're very dedicated!"
        elif QtGui.QMessageBox.No:
            print "You're fired!"
        else:
            print "You chose wisely!"

    #----------------------------------------------------------------------
    def onShowWarning(self):
        """
        Show a warning message
        """
        flags = QtGui.QMessageBox.StandardButton.Ok
        flags |= QtGui.QMessageBox.StandardButton.Discard
        msg = "This message will self-destruct in 30 seconds!"
        response = QtGui.QMessageBox.warning(self, "Warning!",
                                             msg, flags)
        if response == 0:
            print "BOOM!"
        else:
            print "MessageBox disarmed!"

#----------------------------------------------------------------------
if __name__ == "__main__":
    app = QtGui.QApplication([])
    form = MessageBoxDemo()
    form.show()
    app.exec_()
Now let’s take a look at each message box in turn. The first one we’ll look at is the critical message box.
The Critical Message Box

The critical message box is launched from our demo program using the following method:
#----------------------------------------------------------------------
def onShowCriticalMessage(self):
    """
    Show the critical message
    """
    flags = QtGui.QMessageBox.Abort
    flags |= QtGui.QMessageBox.StandardButton.Retry
    flags |= QtGui.QMessageBox.StandardButton.Ignore

    result = QtGui.QMessageBox.critical(self, "CRITICAL ERROR",
                                        "You're trying Perl aren't you?",
                                        flags)
    if result == QtGui.QMessageBox.Abort:
        print "Aborted!"
    elif result == QtGui.QMessageBox.Retry:
        print "Retrying!"
    elif result == QtGui.QMessageBox.Ignore:
        print "Ignoring!"
All message boxes follow the same basic formula. They have a caption (“CRITICAL ERROR”), a message (“You’re trying Perl aren’t you?”) and some flags that control what buttons are shown. In this case, we show an Abort, a Retry and an Ignore button. We print out a special message to stdout that depends on which button is pressed.
The Information Message Box
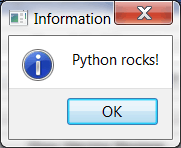
The information message box is probably the simplest of any of the message boxes:
#----------------------------------------------------------------------
def onShowInformation(self):
    """
    Show the information message
    """
    QtGui.QMessageBox.information(self, "Information", "Python rocks!")
As you can see, we didn’t even need to specify any buttons for this one. It added an OK button all by itself.
The Question Message Box
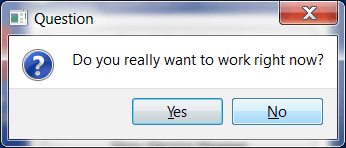
The question message box is pretty simple too. Here’s the code:
#----------------------------------------------------------------------
def onShowQuestion(self):
    """
    Show the question message
    """
    flags = QtGui.QMessageBox.StandardButton.Yes
    flags |= QtGui.QMessageBox.StandardButton.No
    question = "Do you really want to work right now?"
    response = QtGui.QMessageBox.question(self, "Question",
                                          question,
                                          flags)
    if response == QtGui.QMessageBox.Yes:
        print "You're very dedicated!"
    elif QtGui.QMessageBox.No:
        print "You're fired!"
    else:
        print "You chose wisely!"
For this message box, we needed two buttons: yes and no. We also check which button the user pressed and print out special messages based on their choice. You’ll note that there is no way to get the last print statement to execute.
The Warning Message Box

The warning message box is also quite simple and very similar to the question box.
#----------------------------------------------------------------------
def onShowWarning(self):
    """
    Show a warning message
    """
    flags = QtGui.QMessageBox.StandardButton.Ok
    flags |= QtGui.QMessageBox.StandardButton.Discard
    msg = "This message will self-destruct in 30 seconds!"
    response = QtGui.QMessageBox.warning(self, "Warning!",
                                         msg, flags)
    if response == 0:
        print "BOOM!"
    else:
        print "MessageBox disarmed!"
Here we have two buttons: an OK button and a discard button. Again we check to see which button is pressed and act accordingly.
Wrapping Up
Now you know how to create the various standard dialogs and message boxes that PySide provides. These are quite handy when you need to alert the user to something that is amiss in your program or to acquire small bits of information. Now go forth and start using your new-found knowledge wisely!
References
- Zetcode’s PySide tutorial on dialogs
- A PySide repo on git that shows standard dialog and message box examples
- StackOverflow – Print a text through a printer using PyQt4
Download the Source
It would be nice for a post PySide + SQLAlchemy. Very Good
Is PySide stil in development ? Last time I checked, the last update has been done on 2012..
Are we defecting:)
As always a very nice post.
BTW, any chance that the code sections could be wide enough so no horizontal scroll bar is needed? Have planty of screen space but often (just about always) there is a horizontal scrollbar for a few characters.
Yes it’s still in development. And yes, their last official release was in Aug 2012…but when was the last time Tkinter did an update?
That is on my TODO list already. I just need to finish acquainting myself with PySide first.
I really love this . Good serials
def onShowWarning(self):
flags = QtGui.QMessageBox.StandardButton.Ok
flags |= QtGui.QMessageBox.StandardButton.Discard
msg = “This message will self-destruct in 30 seconds!”
response = QtGui.QMessageBox.warning(self, “Warning”,
msg, flags)
if response == QtGui.QMessageBox.Ok:
print(“BOOM!”)
else:
print(“MessageBox disarmed!”)
Pingback: Top Ten Articles of 2013 | Hello Linux
This is an excellent tutorial. Thanks for writing it (said the guy a year late). I noticed that for the standard buttons in the QMessageBox examples you use different syntax in the same declaration. E.g., ‘QtGui.QMessageBox.StandardButton.Abort’ versus ‘QtGui.QMessageBox.Abort’. Is there a reason to use one versus the other? Perhaps including ‘StandardButton’ is more Pythonic (explicit > implicit)?
very interesting printing module, but if I have a PDF created with reportlab and I want to send it to print that I make I will select and print pdf and of course from the print dialog?
Great Tutorials by all standard
I’m sorry I missed this. Sometimes disqus doesn’t alert me to new comments very well. I am not aware of a reason to use one over the other other then explicit is definitely better than implicit.