
The ReportLab toolkit allows you to create interactive fillable forms. The PDF standard actually has a fairly rich set of interactive elements. ReportLab doesn’t support all of these elements, but it does cover most of them. In this section, we will look at the following widgets:
- checkbox
- radio
- choice
- listbox
- textfield
All of these widgets are created by calling various methods on the canvas.acroform property. Note that you can only have one form per document. Let’s take a look at the widgets that ReportLab supports!
Checkbox
The checkbox widget is exactly what it sounds like. It’s a little box that you can check. ReportLab supports several different “check” styles though, so when the checkbox is checked, it can look different depending on the style that you set.
Now let’s write up a simple example that demonstrates how some of these arguments behave:
# simple_checkboxes.py

from reportlab.pdfgen import canvas
from reportlab.pdfbase import pdfform
from reportlab.lib.colors import magenta, pink, blue, green

def create_simple_checkboxes():
    c = canvas.Canvas('simple_checkboxes.pdf')

    c.setFont("Courier", 20)
    c.drawCentredString(300, 700, 'Pets')
    c.setFont("Courier", 14)
    form = c.acroForm

    c.drawString(10, 650, 'Dog:')
    form.checkbox(name='cb1', tooltip='Field cb1',
                  x=110, y=645, buttonStyle='check',
                  borderColor=magenta, fillColor=pink,
                  textColor=blue, forceBorder=True)

    c.drawString(10, 600, 'Cat:')
    form.checkbox(name='cb2', tooltip='Field cb2',
                  x=110, y=595, buttonStyle='cross',
                  borderWidth=2, forceBorder=True)

    c.drawString(10, 550, 'Pony:')
    form.checkbox(name='cb3', tooltip='Field cb3',
                  x=110, y=545, buttonStyle='star',
                  borderWidth=1, forceBorder=True)

    c.drawString(10, 500, 'Python:')
    form.checkbox(name='cb4', tooltip='Field cb4',
                  x=110, y=495, buttonStyle='circle',
                  borderWidth=3, forceBorder=True)

    c.drawString(10, 450, 'Hamster:')
    form.checkbox(name='cb5', tooltip='Field cb5',
                  x=110, y=445, buttonStyle='diamond',
                  borderWidth=None,
                  checked=True,
                  forceBorder=True)

    c.save()

if __name__ == '__main__':
    create_simple_checkboxes()
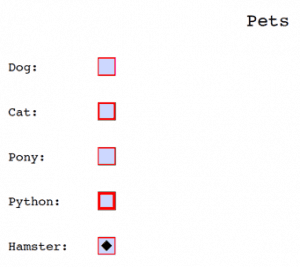
As you can see, we set up the name and set the tooltip to basically match the name of the widget. Then we set its position and a few other things. You can play around with the width of the checkbox’s border or turn the border off. If you turn it off though, the checkbox may become invisible, so you might want to set its background color via fillColor if you do that. I set the buttonStyle to something different for each of the checkboxes. Here is what I get when I run the code:
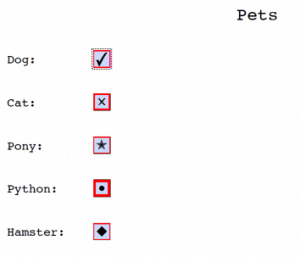
If you open up the document and check all of the checkboxes, you will end up with them looking like this:
Now let’s learn about the radio widget!
Radio
Radio widgets are kind of like checkboxes except that usually you put radio buttons into a group where only one radio button can be selected. Checkboxes are rarely limited to just allowing one checkbox per group. ReportLab does not appear to have a way to explicitly group a set of radio boxes as being together. This appears to only happen implicitly. In other words, if you create a series of radios one after the other, they will be grouped together.
Now let’s take a moment and create a simple demo of the radio widgets:
# simple_radios.py

from reportlab.pdfgen import canvas
from reportlab.pdfbase import pdfform
from reportlab.lib.colors import magenta, pink, blue, green

def create_simple_radios():
    c = canvas.Canvas('simple_radios.pdf')

    c.setFont("Courier", 20)
    c.drawCentredString(300, 700, 'Radio demo')
    c.setFont("Courier", 14)
    form = c.acroForm

    c.drawString(10, 650, 'Dog:')
    form.radio(name='radio1', tooltip='Field radio1',
               value='value1', selected=False,
               x=110, y=645, buttonStyle='check',
               borderStyle='solid', shape='square',
               borderColor=magenta, fillColor=pink,
               textColor=blue, forceBorder=True)
    form.radio(name='radio1', tooltip='Field radio1',
               value='value2', selected=True,
               x=110, y=645, buttonStyle='check',
               borderStyle='solid', shape='square',
               borderColor=magenta, fillColor=pink,
               textColor=blue, forceBorder=True)

    c.drawString(10, 600, 'Cat:')
    form.radio(name='radio2', tooltip='Field radio2',
               value='value1', selected=True,
               x=110, y=595, buttonStyle='cross',
               borderStyle='solid', shape='circle',
               borderColor=green, fillColor=blue,
               borderWidth=2,
               textColor=pink, forceBorder=True)
    form.radio(name='radio2', tooltip='Field radio2',
               value='value2', selected=False,
               x=110, y=595, buttonStyle='cross',
               borderStyle='solid', shape='circle',
               borderColor=green, fillColor=blue,
               borderWidth=2,
               textColor=pink, forceBorder=True)

    c.drawString(10, 550, 'Pony:')
    form.radio(name='radio3', tooltip='Field radio3',
               value='value1', selected=False,
               x=110, y=545, buttonStyle='star',
               borderStyle='bevelled', shape='square',
               borderColor=blue, fillColor=green,
               borderWidth=2,
               textColor=magenta, forceBorder=False)
    form.radio(name='radio3', tooltip='Field radio3',
               value='value2', selected=True,
               x=110, y=545, buttonStyle='star',
               borderStyle='bevelled', shape='circle',
               borderColor=blue, fillColor=green,
               borderWidth=2,
               textColor=magenta, forceBorder=True)

    c.save()

if __name__ == '__main__':
    create_simple_radios()
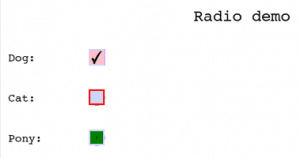
When you run this code, you will notice that you only get 3 radios. This is because you are required to create two instances of each radio button with the same name, but with different values and sections. The documentation does not state why, but I assume this is done to help ReportLab track the “selected” state of the widget. This also allows you to change the appearance of the radio when it is selected or deselected.
Now let’s discover how to create a choice widget!
Choice
The choice widget is basically a combobox that displays a dropdown when the user clicks on it. This allows the user to pick one or more options from the drop-down list, depending on the fieldFlags you have set. If you add edit to the fieldFlags, then the user can edit item in the choice widget.
Let’s take a moment to create a couple of choice widgets in a PDF document:
# simple_choices.py

from reportlab.pdfgen import canvas
from reportlab.pdfbase import pdfform
from reportlab.lib.colors import magenta, pink, blue, green, red

def create_simple_choices():
    c = canvas.Canvas('simple_choices.pdf')

    c.setFont("Courier", 20)
    c.drawCentredString(300, 700, 'Choices')
    c.setFont("Courier", 14)
    form = c.acroForm

    c.drawString(10, 650, 'Choose a letter:')
    options = [('A','Av'),'B',('C','Cv'),('D','Dv'),'E',('F',),('G','Gv')]
    form.choice(name='choice1', tooltip='Field choice1',
                value='A',
                x=165, y=645, width=72, height=20,
                borderColor=magenta, fillColor=pink,
                textColor=blue, forceBorder=True, options=options)

    c.drawString(10, 600, 'Choose an animal:')
    options = [('Cat', 'cat'), ('Dog', 'dog'), ('Pig', 'pig')]
    form.choice(name='choice2', tooltip='Field choice2',
                value='Cat',
                options=options,
                x=165, y=595, width=72, height=20,
                borderStyle='solid', borderWidth=1,
                forceBorder=True)

    c.save()

if __name__ == '__main__':
    create_simple_choices()
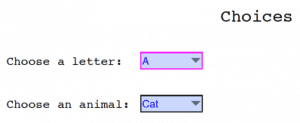
In this example, we create two choice widgets with slightly different styles applied. While I couldn’t find it anywhere in the documentation, the value argument appears to be required. If you do not include it, you will get a rather bizarre error that doesn’t say anything about that argument being missing. Anyway, when you run this code, you will find that it generates something like this:
Now let’s learn about the listbox!
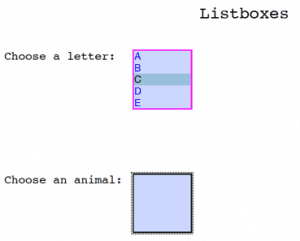
Listbox
The listbox widget is kind of like the choice widget except that a listbox is a scrollable box instead of a combobox. You can use the fieldFlags argument to allow the user to select one or more items from the listbox.
Now let’s write up a quick demo so we can see how you might create one of these widgets:
# simple_listboxes.py

from reportlab.pdfgen import canvas
from reportlab.pdfbase import pdfform
from reportlab.lib.colors import magenta, pink, blue, green, red

def create_simple_listboxes():
    c = canvas.Canvas('simple_listboxes.pdf')

    c.setFont("Courier", 20)
    c.drawCentredString(300, 700, 'Listboxes')
    c.setFont("Courier", 14)
    form = c.acroForm

    c.drawString(10, 650, 'Choose a letter:')
    options = [('A','Av'),'B',('C','Cv'),('D','Dv'),'E',('F',),('G','Gv')]
    form.listbox(name='listbox1', value='A',
                x=165, y=590, width=72, height=72,
                borderColor=magenta, fillColor=pink,
                textColor=blue, forceBorder=True, options=options,
                fieldFlags='multiSelect')

    c.drawString(10, 500, 'Choose an animal:')
    options = [('Cat', 'cat'), ('Dog', 'dog'), ('Pig', 'pig')]
    form.listbox(name='choice2', tooltip='Field choice2',
                value='Cat',
                options=options,
                x=165, y=440, width=72, height=72,
                borderStyle='solid', borderWidth=1,
                forceBorder=True)

    c.save()

if __name__ == '__main__':
    create_simple_listboxes()
This example is actually pretty similar to the previous one where we created the choice widget. The main difference here is the look of the listbox widget versus the choice widget. Otherwise, they are pretty much the same. Following is a screenshot of what this code generates:
Now let’s learn about the textfield widget!
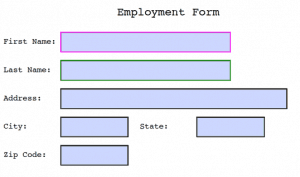
Textfield
The textfield is a text entry widget. You will see these in forms for entering your name and address. Most of the arguments for the textfield are the same as the ones you’ve seen in the previous widgets.
# simple_form.py

from reportlab.pdfgen import canvas
from reportlab.pdfbase import pdfform
from reportlab.lib.colors import magenta, pink, blue, green

def create_simple_form():
    c = canvas.Canvas('simple_form.pdf')

    c.setFont("Courier", 20)
    c.drawCentredString(300, 700, 'Employment Form')
    c.setFont("Courier", 14)
    form = c.acroForm

    c.drawString(10, 650, 'First Name:')
    form.textfield(name='fname', tooltip='First Name',
                   x=110, y=635, borderStyle='inset',
                   borderColor=magenta, fillColor=pink,
                   width=300,
                   textColor=blue, forceBorder=True)

    c.drawString(10, 600, 'Last Name:')
    form.textfield(name='lname', tooltip='Last Name',
                   x=110, y=585, borderStyle='inset',
                   borderColor=green, fillColor=magenta,
                   width=300,
                   textColor=blue, forceBorder=True)

    c.drawString(10, 550, 'Address:')
    form.textfield(name='address', tooltip='Address',
                   x=110, y=535, borderStyle='inset',
                   width=400, forceBorder=True)

    c.drawString(10, 500, 'City:')
    form.textfield(name='city', tooltip='City',
                   x=110, y=485, borderStyle='inset',
                   forceBorder=True)

    c.drawString(250, 500, 'State:')
    form.textfield(name='state', tooltip='State',
                   x=350, y=485, borderStyle='inset',
                   forceBorder=True)

    c.drawString(10, 450, 'Zip Code:')
    form.textfield(name='zip_code', tooltip='Zip Code',
                   x=110, y=435, borderStyle='inset',
                   forceBorder=True)

    c.save()

if __name__ == '__main__':
    create_simple_form()
Here we create a series of textfields with different settings applied to them. As you can see, we changed the border and background color on several of the fields. Then we just added some fairly standard ones. We also used the width parameter to change how wide the textfield is.
Here is what this code ended up generating for me:
Wrapping Up
In this article we learned how to create the various widgets that ReportLab supports for creating interactive PDF forms. You will want to go grab a copy of the ReportLab User’s Guide to learn about the various widget shapes, border types, field flags and annotation flags that the widgets support though as that isn’t easy to reproduce here. As you can see, ReportLab does provide all that you need to create fairly robust forms though.
Related Reading
- ReportLab forum post about interactive forms
- ReportLab’s test source code for interactive forms on Bitbucket
- ReportLab’s form implementation source on Bitbucket
- Filling PDF Forms with Python
Pingback: Creating PDFs with PyFPDF and Python | The Mouse Vs. The Python
Pingback: Rotating Images in ReportLab - The Mouse Vs. The Python