
ReportLab is the primary toolkit that I use for generating PDFs from scratch. However, I have found that there is another one called fpdf2. The fpdf2 package is actually a port of the “Free”-PDF package that was written in PHP.
Note: PyFPDF is now dead. This article was originally written with that package in mind. It has been replaced with fpdf2
This article will not be exhaustive in its coverage of the fpdf2 package. However it will cover more than enough for you to get started using it effectively. Note that there is a short book on PyFPDF called “Python does PDF: pyFPDF” by Edwood Ocasio on Leanpub if you would like to learn more about the library than what is covered in this chapter or the package’s documentation.
Installation
Installing fpdf2 is easy since it was designed to work with pip. Here’s how:
python -m pip install fpdf2
You will notice when you are installing this package that it has no dependencies, which is nice.
 |
Want to learn more about working with PDFs in Python? Then check out my book:
ReportLab: PDF Processing with Python |
Basic Usage
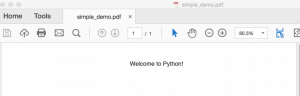
Now that you have fpdf2 installed, let’s try using it to create a simple PDF. Open up your Python editor and create a new file called simple_demo.py. Then enter the following code into it:
# simple_demo.py

from fpdf import FPDF

pdf = FPDF()
pdf.add_page()
pdf.set_font("Arial", size=12)
pdf.cell(200, 10, txt="Welcome to Python!", ln=1, align="C")
pdf.output("simple_demo.pdf")
The first item that we need to talk about is the import. Here we import the FPDF class from the fpdf package. The defaults for this class are to create the PDF in Portrait mode, use millimeters for its measurement unit and to use the A4 page size. If you wanted to be explicit, you could write the instantiation line like this:
pdf = FPDF(orientation='P', unit='mm', format='A4')
I am not a fan of using the letter ‘P’ to tell the class what its orientation is. You may also use ‘L’ if you prefer landscape over portrait.
The fpdf2 package supports ‘pt’, ‘cm’ and ‘in’ as alternative measurement units.
If you go diving into the source, you will find that the fpdf2 package only supports the following page sizes:
- A3
- A4
- A5
- letter
- legal
This is a bit limiting compared to ReportLab where you have several additional sizes supported out of the box and you can set the page size to something custom as well.
Anyway, the next step is to create a page using the add_page method. Then we set the page’s font via the set_font method. You will note that we pass in the font’s family name and the size that we want. You can also set the font’s style with the style argument. If you want to do this, note that it takes a string such as ‘B’ for bold or ‘BI’ for Bold-Italicized.
Next, we create a cell that is 200 millimeters wide and 10 millimeters high. A cell is basically a flowable that holds text and can have a border enabled. It will split automatically if automatic page break is enabled and the cell goes beyond the page’s size limit. The txt parameter is the text that you want to print in the PDF. The ln parameter tells PyFPDF to add a line break if set to one, which is what we do here. Finally, we can set the alignment of the text to either be aligned (the default) or centered (‘C’). We chose the latter here.
Finally, we save the document to disk by calling the output method with the path to the file that we want to save.
When I ran this code, I ended up with a PDF that looked like this:
Now let’s learn a little bit about how fpdf2 works with fonts.
Working with Fonts
The fpdf2 has a set of core fonts hard-coded into its FPDF class:
self.core_fonts={'courier': 'Courier',
    'courierB': 'Courier-Bold',
    'courierBI': 'Courier-BoldOblique',
    'courierI': 'Courier-Oblique',
    'helvetica': 'Helvetica',
    'helveticaB': 'Helvetica-Bold',
    'helveticaBI': 'Helvetica-BoldOblique',
    'helveticaI': 'Helvetica-Oblique',
    'symbol': 'Symbol',
    'times': 'Times-Roman',
    'timesB': 'Times-Bold',
    'timesBI': 'Times-BoldItalic',
    'timesI': 'Times-Italic',
    'zapfdingbats': 'ZapfDingbats'}
You will note that Arial is not listed here even though we used it in the previous example. Arial is getting remapped to Helvetica in the actual source code, so you are not really using Arial at all. Anyway, let’s learn how you can change fonts using fpdf2:
# change_fonts.py

from fpdf import FPDF

def change_fonts():
    pdf = FPDF()
    pdf.add_page()
    font_size = 8
    for font in pdf.core_fonts:
        if any([letter for letter in font if letter.isupper()]):
            # skip this font
            continue
        pdf.set_font(font, size=font_size)
        txt = "Font name: {} - {} pts".format(font, font_size)
        pdf.cell(0, 10, txt=txt, ln=1, align="C")
        font_size += 2

    pdf.output("change_fonts.pdf")

if __name__ == '__main__':
    change_fonts()
Here we create a simple function called change_fonts and then we create an instance of the FPDF class. The next step is to create a page and then loop over the core fonts. When I tried that, I discovered that fpdf2 doesn’t consider the variant names of its core fonts as valid fonts (i.e. helveticaB, helveticaBI, etc). So to skip those variants, we create a list comprehension and check for any capital characters in the font’s name. If there is one, we skip that font. Otherwise, we set the font and the font size and write it out. We also increase the font size by two points each time through the loop. If you want to change the font’s color, then you can call set_text_color and pass in the RGB value that you require.
The result of running this code looks like this:

I like how easy it is to change fonts in fpdf2. However, the number of core fonts is pretty small. You can add TrueType, OpenType or Type1 fonts using fpdf2 though via the add_font method. This method takes the following arguments:
- family (font family)
- style (font style)
- fname (font file name or full path to font file)
- uni (TTF Unicode flag)
The example that fpdf2’s documentation uses is as follows:
pdf.add_font('DejaVu', '', 'DejaVuSansCondensed.ttf', uni=True)
You would call add_font before attempting to use it via the set_font method. I tried this on Windows and got an error as Windows couldn’t find this font, which is what I expected. This is a really simple way to add fonts though and will probably work. Note that it uses the following search paths:
- FPDF_FONTPATH
- SYSTEM_TTFONTS
These appear to be constants that are defined either in your environment or in the PyFPDF package itself. The documentation does not explain how these are set or modified. Instead, you should use set_global() with the path to the fonts that you want to use.:
import fpdf

fpdf_mod.set_global("SYSTEM_TTFONTS", os.path.join(os.path.dirname(__file__),'fonts'))
The SYSTEM_TTFONTS is set to None by default otherwise.
Drawing
The fpdf2 package has limited drawing support. You can draw lines, ellipses and rectangles. Let’s take a look at how to draw lines first:
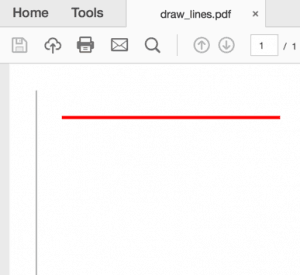
# draw_lines.py

from fpdf import FPDF

def draw_lines():
    pdf = FPDF()
    pdf.add_page()
    pdf.line(10, 10, 10, 100)
    pdf.set_line_width(1)
    pdf.set_draw_color(255, 0, 0)
    pdf.line(20, 20, 100, 20)
    pdf.output('draw_lines.pdf')

if __name__ == '__main__':
    draw_lines()
Here we call the line method and pass it two pairs of x/y coordinates. The line width defaults to 0.2 mm so we increase it to 1 mm for the second line by calling the set_line_width method. We also set the color of the second line by calling set_draw_color to an RGB value equivalent to red. The output looks like this:
Now we can move on and draw a couple of shapes:
# draw_shapes.py

from fpdf import FPDF

def draw_shapes():
    pdf = FPDF()
    pdf.add_page()
    pdf.set_fill_color(255, 0, 0)
    pdf.ellipse(10, 10, 10, 100, 'F')

    pdf.set_line_width(1)
    pdf.set_fill_color(0, 255, 0)
    pdf.rect(20, 20, 100, 50)
    pdf.output('draw_shapes.pdf')

if __name__ == '__main__':
    draw_shapes()
When you draw a shape like an ellipse or a rect, you will need to pass in the x and y coordinates that represent the upper left corner of the drawing. Then you will want to pass in the width and height of the shape. The last argument you can pass in is for style which can be “D” or an empty string (default), “F” for fill or “DF” for draw and fill. In this example, we fill the ellipse and use the default for the rectangle. The result ends up looking like this:

Now let’s learn about image support.
Adding Images
The fpdf2 package supports adding JPEG, PNG and GIF formats to your PDF. If you happen to try to use an animated GIF, only the first frame is used. Also of note is that if you add the same image multiple times to the document, fpdf2 is smart enough to only embed one actual copy of the image. Here is a very simple example of adding an image to a PDF using fpdf2:
# add_image.py

from fpdf import FPDF

def add_image(image_path):
    pdf = FPDF()
    pdf.add_page()
    pdf.image(image_path, x=10, y=8, w=100)
    pdf.set_font("Arial", size=12)
    pdf.ln(85)  # move 85 down
    pdf.cell(200, 10, txt="{}".format(image_path), ln=1)
    pdf.output("add_image.pdf")

if __name__ == '__main__':
    add_image('snakehead.jpg')
The new piece of code here is the call to the image method. Its signature looks like the this:
image(name, x = None, y = None, w = 0, h = 0, type = '', link = '')
You specify the image file path, the x and y coordinate and the width and height. If you only specify the width or the height, the other is calculated for you and attempts to maintain the original proportions of the image. You can also specify the file type explicitly, otherwise it is guessed from the file name. Finally, you can add a link / URL when adding the image.
When you run this code, you should see something like the following:

Now let’s learn how fpdf2 supports doing multipage documents.
Multipage Documents
fpdf2 had multipage support enabled by default. If you add enough cells to a page, it will automatically create a new page and continue to add your new text to the next page. Here is a simple example:
# multipage_simple.py

from fpdf import FPDF

def multipage_simple():
    pdf = FPDF()
    pdf.set_font("Arial", size=12)
    pdf.add_page()
    line_no = 1
    for i in range(100):
        pdf.cell(0, 10, txt="Line #{}".format(line_no), ln=1)
        line_no += 1
    pdf.output("multipage_simple.pdf")

if __name__ == '__main__':
    multipage_simple()
All this does is create 100 lines of text. When I ran this code, I ended up with a PDF that contained 4 pages of text.
Headers and Footers
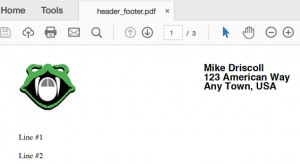
The fpdf2 package has built-in support for adding headers, footers and page numbers. The FPDF class just needs to be sub-classed and the the header and footer methods overridden to make them work. Let’s take a look:
# header_footer.py

from fpdf import FPDF

class CustomPDF(FPDF):

    def header(self):
        # Set up a logo
        self.image('snakehead.jpg', 10, 8, 33)
        self.set_font('Arial', 'B', 15)

        # Add an address
        self.cell(100)
        self.cell(0, 5, 'Mike Driscoll', ln=1)
        self.cell(100)
        self.cell(0, 5, '123 American Way', ln=1)
        self.cell(100)
        self.cell(0, 5, 'Any Town, USA', ln=1)

        # Line break
        self.ln(20)

    def footer(self):
        self.set_y(-10)

        self.set_font('Arial', 'I', 8)

        # Add a page number
        page = 'Page ' + str(self.page_no()) + '/{nb}'
        self.cell(0, 10, page, 0, 0, 'C')

def create_pdf(pdf_path):
    pdf = CustomPDF()
    # Create the special value {nb}
    pdf.alias_nb_pages()
    pdf.add_page()
    pdf.set_font('Times', '', 12)
    line_no = 1
    for i in range(50):
        pdf.cell(0, 10, txt="Line #{}".format(line_no), ln=1)
        line_no += 1
    pdf.output(pdf_path)

if __name__ == '__main__':
    create_pdf('header_footer.pdf')
Since this is a fairly long piece of code, let’s go over this piece-by-piece. The first section that we want to look at is the header method:
def header(self):
    # Set up a logo
    self.image('snakehead.jpg', 10, 8, 33)
    self.set_font('Arial', 'B', 15)

    # Add an address
    self.cell(100)
    self.cell(0, 5, 'Mike Driscoll', ln=1)
    self.cell(100)
    self.cell(0, 5, '123 American Way', ln=1)
    self.cell(100)
    self.cell(0, 5, 'Any Town, USA', ln=1)

    # Line break
    self.ln(20)
Here we just hard-code in the logo image that we want to use and then we set the font that we will be using in our header. Next we add an address and we position that address to the right of the image. You will notice that when you are using fpdf2, the origin is the top left of the page. So if we want to move our text over to the right, then we need to create a cell with a number of units of measurement. In this case, we move the next three lines over to the right by adding a cell of 100 mm. Then we add a line break at the end, which should add 20 mm of vertical space.
Next up, we want to override the footer method:
def footer(self):
    self.set_y(-10)

    self.set_font('Arial', 'I', 8)

    # Add a page number
    page = 'Page ' + str(self.page_no()) + '/{nb}'
    self.cell(0, 10, page, 0, 0, 'C')
The first thing we do here is set the y-position of the origin on the page to -10 mm or -1 cm. This puts the footer’s origin right above the bottom of the page. Then we set our font for the footer. Finally, we create the page number text. You will note the reference to {nb}. This is a special value in fpdf2 that is inserted when you call alias_nb_pages and represents the total number of pages in the document. The last step in the footer is to write the page text on the page and center it.
The final piece of code to look at is in the create_pdf function:
def create_pdf(pdf_path):
    pdf = CustomPDF()
    # Create the special value {nb}
    pdf.alias_nb_pages()
    pdf.add_page()
    pdf.set_font('Times', '', 12)
    line_no = 1
    for i in range(50):
        pdf.cell(0, 10, txt="Line #{}".format(line_no), ln=1)
        line_no += 1
    pdf.output(pdf_path)
This is where we call the somewhat magical alias_nb_pages method that will help us get the total number of pages. We also set the font for the portion of the page that is not taken up by the header or footer. Then we write 50 lines of text to the document to make it create a multipage PDF.
When you run this code you should see a page that looks something like this:
Now let’s find out how you can create tables with PyFPDF.
Tables
The fpdf2 package does not have a table control. Instead, you have to build your tables using cells or HTML. Let’s take a look at how you might create a table using cells first:
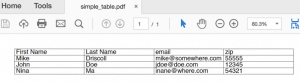
# simple_table.py

from fpdf import FPDF

def simple_table(spacing=1):
    data = [['First Name', 'Last Name', 'email', 'zip'],
            ['Mike', 'Driscoll', 'mike@somewhere.com', '55555'],
            ['John', 'Doe', 'jdoe@doe.com', '12345'],
            ['Nina', 'Ma', 'inane@where.com', '54321']
            ]

    pdf = FPDF()
    pdf.set_font("Arial", size=12)
    pdf.add_page()

    col_width = pdf.w / 4.5
    row_height = pdf.font_size
    for row in data:
        for item in row:
            pdf.cell(col_width, row_height*spacing,
                     txt=item, border=1)
        pdf.ln(row_height*spacing)

    pdf.output('simple_table.pdf')

if __name__ == '__main__':
    simple_table()
Here we just create a simple list of lists and then loop over it. For each row in the list and each element in the nested row, we add a cell to our PDF object. Note that we turn the border on for these cells. When we finish iterating over a row, we add a linebreak. If you want the cells to have more space in the cells, then you can pass in a spacing value. When I ran this script, I ended up with a table that looked like this:
This is a pretty crude way to create tables though. I personally prefer ReportLab’s methodology here.
The alternative method is to use HTML to create your table:
# simple_table_html.py

from fpdf import FPDF, HTMLMixin

class HTML2PDF(FPDF, HTMLMixin):
    pass

def simple_table_html():
    pdf = HTML2PDF()

    table = """
| Header 1 | header 2 |
|---|---|
| cell 1 | cell 2 |
| cell 2 | cell 3 |
Here we use fpdf2’s HTMLMixin class to allow it to accept HTML as an input and transform that into a PDF. When you run this example, you will end up with the following:

There are some examples on the website that use the Web2Py framework in conjunction with PyFPDF to create better looking tables, but the code was incomplete so I won’t be demonstrating that here.
Transform HTML to PDF
The fpdf2 package has some limited support for HTML tags. You can create headings, paragraphs and basic text styling using HTML. You can also add hyperlinks, images, lists and tables. Check the documentation for the full list of tags and attributes that are supported. You can then take basic HTML and turn it into a PDF using the HTMLMixin that we saw in the previous section when we created our table.
# html2fpdf.py

from fpdf import FPDF, HTMLMixin

class HTML2PDF(FPDF, HTMLMixin):
    pass

def html2pdf():
    html = '''
fpdf2 HTML Demo
This is regular text
You can also bold, italicize or underline ”’ pdf = HTML2PDF() pdf.add_page() pdf.write_html(html) pdf.output(‘html2pdf.pdf’) if __name__ == ‘__main__’: html2pdf()
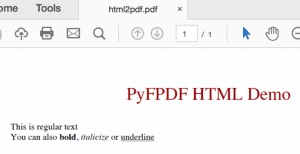
Here we just use pretty standard HTML markup to design the PDF. It actually ends up looking pretty good when you run this code:
Web2Py
The Web2Py framework includes fpdf2 package to make creating reports in the framework easier. This allows you to create PDF templates in Web2Py. The documentation is a bit scarce on this subject, so I won’t be covering this subject in this book. However, it does appear that you can do halfway decent reports using Web2Py this way.
Templates
You can also create templates using fpdf2. The package even includes a designer script that uses wxPython for its user interface. The templates that you can create would be where you want to specify where each element appears on the page, its style (font, size, etc) and the default text to use. The templating system supports using CSV files or databases. There is only one example in the documentation on this subject though, which is a bit disappointing. While I do think this part of the library holds promise, due to the lack of documentation, I don’t feel comfortable writing about it extensively.
Wrapping Up
The fpdf2 package is a fairly nice project that lets you do basic PDF generation. They do point out in the FAQ that they do not support charts or widgets or a “flexible page layout system” like ReportLab. They also do not support PDF text extraction or conversions like PDFMiner or PyPDF2. However, if all you need are the bare-bone basics to generate a PDF, then this library might work for you. I think its learning curve is simpler than ReportLab’s is. However, fpdf2 is nowhere near as feature-rich as ReportLab and I didn’t feel like you had quite the same granularity of control when it came to placing elements on the page.
Related Reading
- Creating Interactive PDF Forms in ReportLab with Python
- Filling PDF Forms with Python
- Exporting Data from PDFs with Python
Pingback: Center the page number in a footer using PyPDF – PythonCharm
Pingback: Creating a Rich Text File (rtf) in Python – PythonCharm
Pingback: Top 10 Most Read Mouse vs Python Articles of 2019 - The Mouse Vs. The Python