
Several years ago, I created an XML editor with the wxPython GUI toolkit called Boomslang. I recently thought it would be fun to port that code to Textual so I could have an XML viewer and editor in my terminal as well.
In this article, you will learn how that experiment went and see the results. Here is a quick outline of what you will cover:
- Get the packages you will need
- Create the main UI
- Creating the edit XML screen
- The add node screen
- Adding an XML preview screen
- Creating file browser and warning screens
- Creating the file save screen
Let’s get started!
Getting the Dependencies
You will need Textual to be able to run the application detailed in this tutorial. You will also need lxml, which is a super fast XML parsing package. You can install Textual using pip or uv. You can probably use uv with lxml as well, but pip definitely works.
Here’s an example using pip to install both packages:
python -m pip install textual lxml
Once pip has finished installing Textual and the lxml package and all its dependencies, you will be ready to continue!
Creating the Main UI
The first step in creating the user interface is figuring out what it should look like. Here is the original Boomslang user interface that was created using wxPython:
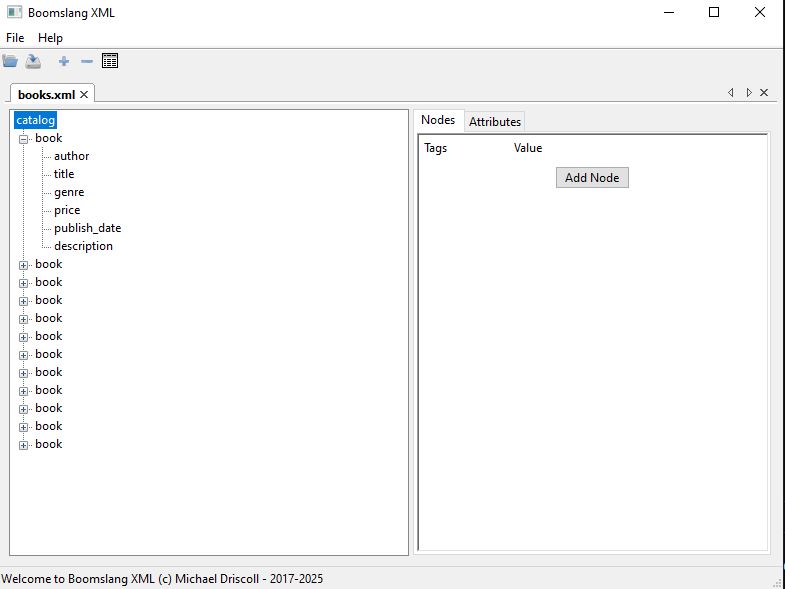
You want to create something similar to this UI, but in your terminal. Open up your favorite Python IDE and create a new file called boomslang.py and then enter the following code into it:
from pathlib import Path

from .edit_xml_screen import EditXMLScreen
from .file_browser_screen import FileBrowser

from textual import on
from textual.app import App, ComposeResult
from textual.containers import Horizontal, Vertical
from textual.widgets import Button, Header, Footer, OptionList


class BoomslangXML(App):
    BINDINGS = [
        ("ctrl+o", "open", "Open XML File"),
    ]
    CSS_PATH = "main.tcss"

    def __init__(self) -> None:
        super().__init__()
        self.title = "Boomslang XML"
        self.recent_files_path = Path(__file__).absolute().parent / "recent_files.txt"
        self.app_selected_file: Path | None = None
        self.current_recent_file: Path | None = None

    def compose(self) -> ComposeResult:
        self.recent_files = OptionList("", id="recent_files")
        self.recent_files.border_title = "Recent Files"
        yield Header()
        yield self.recent_files
        yield Vertical(
            Horizontal(
                Button("Open XML File", id="open_xml_file", variant="primary"),
                Button("Open Recent", id="open_recent_file", variant="warning"),
                id="button_row",
            )
        )
        yield Footer()

    def on_mount(self) -> None:
        self.update_recent_files_ui()

    def action_open(self) -> None:
        self.push_screen(FileBrowser())

    def on_file_browser_selected(self, message: FileBrowser.Selected) -> None:
        path = message.path
        if path.suffix.lower() == ".xml":
            self.update_recent_files_on_disk(path)
            self.push_screen(EditXMLScreen(path))
        else:
            self.notify("Please choose an XML File!", severity="error", title="Error")

    @on(Button.Pressed, "#open_xml_file")
    def on_open_xml_file(self) -> None:
        self.push_screen(FileBrowser())

    @on(Button.Pressed, "#open_recent_file")
    def on_open_recent_file(self) -> None:
        if self.current_recent_file is not None and self.current_recent_file.exists():
            self.push_screen(EditXMLScreen(self.current_recent_file))

    @on(OptionList.OptionSelected, "#recent_files")
    def on_recent_files_selected(self, event: OptionList.OptionSelected) -> None:
        self.current_recent_file = Path(event.option.prompt)

    def update_recent_files_ui(self) -> None:
        if self.recent_files_path.exists():
            self.recent_files.clear_options()
            files = self.recent_files_path.read_text()
            for file in files.split("\n"):
                self.recent_files.add_option(file.strip())

    def update_recent_files_on_disk(self, path: Path) -> None:
        if path.exists() and self.recent_files_path.exists():
            recent_files = self.recent_files_path.read_text()
            if str(path) in recent_files:
                return

            with open(self.recent_files_path, mode="a") as f:
                f.write(str(path) + "\n")

            self.update_recent_files_ui()
        elif not self.recent_files_path.exists():
            with open(self.recent_files_path, mode="a") as f:
                f.write(str(path) + "\n")

def main() -> None:
    app = BoomslangXML()
    app.run()

if __name__ == "__main__":
    main()
That’s a good chunk of code, but it’s still less than a hundred lines. You will go over it in smaller chunks though. You can start with this first chunk:
from pathlib import Path

from .edit_xml_screen import EditXMLScreen
from .file_browser_screen import FileBrowser

from textual import on
from textual.app import App, ComposeResult
from textual.containers import Horizontal, Vertical
from textual.widgets import Button, Header, Footer, OptionList


class BoomslangXML(App):
    BINDINGS = [
        ("ctrl+o", "open", "Open XML File"),
    ]
    CSS_PATH = "main.tcss"

    def __init__(self) -> None:
        super().__init__()
        self.title = "Boomslang XML"
        self.recent_files_path = Path(__file__).absolute().parent / "recent_files.txt"
        self.app_selected_file: Path | None = None
        self.current_recent_file: Path | None = None
You need a few imports to make your code work. The first import comes from Python itself and gives your code the ability to work with file paths. The next two are for a couple of small custom files you will create later on. The rest of the imports are from Textual and provide everything you need to make a nice little Textual application.
Next, you create the BoomslangXML class where you set up a keyboard binding and set which CSS file you will be using for styling your application.
The __init__() method sets the following:
- The title of the application
- The recent files path, which contains all the files you have recently opened
- The currently selected file or None
- The current recent file (i.e. the one you have open at the moment) or None
Now you are ready to create the main UI:
def compose(self) -> ComposeResult:
    self.recent_files = OptionList("", id="recent_files")
    self.recent_files.border_title = "Recent Files"
    yield Header()
    yield self.recent_files
    yield Vertical(
            Horizontal(
                Button("Open XML File", id="open_xml_file", variant="primary"),
                Button("Open Recent", id="open_recent_file", variant="warning"),
                id="button_row",
            )
        )
    yield Footer()
To create your user interface, you need a small number of widgets:
- A header to identify the name of the application
- An OptionList which contains the recently opened files, if any, that the user can reload
- A button to load a new XML file
- A button to load from the selected recent file
- A footer to show the application’s keyboard shortcuts
Next, you will write a few event handlers:
def on_mount(self) -> None:
    self.update_recent_files_ui()

def action_open(self) -> None:
    self.push_screen(FileBrowser())

def on_file_browser_selected(self, message: FileBrowser.Selected) -> None:
    path = message.path
    if path.suffix.lower() == ".xml":
        self.update_recent_files_on_disk(path)
        self.push_screen(EditXMLScreen(path))
    else:
        self.notify("Please choose an XML File!", severity="error", title="Error")
The code above contains the logic for three event handlers:
on_mount()– After the application loads, it will update the OptionList by reading the text file that contains paths to the recent files.action_open()– A keyboard shortcut action that gets called when the user presses CTRL+O. It will then show a file browser to the user so they can pick an XML file to load.on_file_browser_selected()– Called when the user picks an XML file from the file browser and closes the file browser. If the file is an XML file, you will reload the screen to allow XML editing. Otherwise, you will notify the user to choose an XML file.
The next chunk of code is for three more event handlers:
@on(Button.Pressed, "#open_xml_file")
def on_open_xml_file(self) -> None:
    self.push_screen(FileBrowser())

@on(Button.Pressed, "#open_recent_file")
def on_open_recent_file(self) -> None:
    if self.current_recent_file is not None and self.current_recent_file.exists():
        self.push_screen(EditXMLScreen(self.current_recent_file))

@on(OptionList.OptionSelected, "#recent_files")
def on_recent_files_selected(self, event: OptionList.OptionSelected) -> None:
    self.current_recent_file = Path(event.option.prompt)
These event handlers use Textual’s handy @ondecorator, which allows you to bind the event to a specific widget or widgets.
on_open_xml_file()– If the user presses the “Open XML File” button, this method is called and it will show the file browser.on_open_recent_file()– If the user presses the “Open Recent” button, this method gets called and will load the selected recent file.on_recent_files_selected()– When the user selects a recent file in the OptionList widget, this method gets called and sets thecurrent_recent_filevariable.
You only have two more methods to go over. The first is for updating the recent files UI:
def update_recent_files_ui(self) -> None:
    if self.recent_files_path.exists():
        self.recent_files.clear_options()
        files = self.recent_files_path.read_text()
        for file in files.split("\n"):
            self.recent_files.add_option(file.strip())
Remember, this method gets called by on_mount()and it will update the OptionList, if the file exists. The first thing this code will do is clear the OptionList in preparation for updating it. Then you will read the text from the file and loop over each path in that file.
As you loop over the paths, you add them to the OptionList. That’s it! You now have a recent files list that the user can choose from.
The last method to write is for updating the recent files text file:
def update_recent_files_on_disk(self, path: Path) -> None:
    if path.exists() and self.recent_files_path.exists():
        recent_files = self.recent_files_path.read_text()
        if str(path) in recent_files:
            return

        with open(self.recent_files_path, mode="a") as f:
            f.write(str(path) + "\n")

        self.update_recent_files_ui()
    elif not self.recent_files_path.exists():
        with open(self.recent_files_path, mode="a") as f:
            f.write(str(path) + "\n")
When the user opens a new XML file, you want to add that file to the recent file list on disk so that the next time the user opens your application, you can show the user the recent files. This is a nice way to make loading previous files much easier.
The code above will verify that the file still exists and that your recent files file also exists. Assuming that they do, you will check to see if the current XML file is already in the recent files file. If it is, you don’t want to add it again, so you return.
Otherwise, you open the recent files file in append mode, add the new file to disk and update the UI.
If the recent files file does not exist, you create it here and add the new path.
Here are the last few lines of code to add:
def main() -> None:
    app = BoomslangXML()
    app.run()

if __name__ == "__main__":
    main()
You create a main()function to create the Textual application object and run it. You do this primarily for making the application runnable by uv, Python’s fastest package installer and resolver.
Now you’re ready you move on and add some CSS styling to your UI.
Your XML editor doesn’t require extensive styling. In fact, there is nothing wrong with being minimalistic.
Open up your favorite IDE or text editor and create a new file named main.tcssand then add the following code:
BoomslangXML {
    #button_row {
        align: center middle;
    }

    Horizontal{
        height: auto;
    }

    OptionList {
        border: solid green;
    }

    Button {
        margin: 1;
    }
}
Here you center the button row on your screen. You also set the Horizontalcontainer’s height to auto, which tells Textual to make the container fit its contents. You also add a border to your OptionListand a margin to your buttons.
The XML editor screen is fairly complex, so that’s what you will learn about next.
Creating the Edit XML Screen
The XML editor screen is more complex than the main screen of your application and contains almost twice as many lines of code. But that’s to be expected when you realize that most of your logic will reside here.
As before, you will start out by writing the full code and then going over it piece-by-piece. Open up your Python IDE and create a new file named edit_xml_screen.pyand then enter the following code:
import lxml.etree as ET
import tempfile
from pathlib import Path

from .add_node_screen import AddNodeScreen
from .preview_xml_screen import PreviewXMLScreen

from textual import on
from textual.app import ComposeResult
from textual.containers import Horizontal, Vertical, VerticalScroll
from textual.screen import ModalScreen
from textual.widgets import Footer, Header, Input, Tree
from textual.widgets._tree import TreeNode


class DataInput(Input):
    """
    Create a variant of the Input widget that stores data
    """

    def __init__(self, xml_obj: ET.Element, *args, **kwargs) -> None:
        super().__init__(*args, **kwargs)
        self.xml_obj = xml_obj


class EditXMLScreen(ModalScreen):
    BINDINGS = [
        ("ctrl+s", "save", "Save"),
        ("ctrl+a", "add_node", "Add Node"),
        ("p", "preview", "Preview"),
        ("escape", "esc", "Exit dialog"),
    ]
    CSS_PATH = "edit_xml_screens.tcss"

    def __init__(self, xml_path: Path, *args, **kwargs):
        super().__init__(*args, **kwargs)
        self.xml_tree = ET.parse(xml_path)
        self.expanded = {}
        self.selected_tree_node: None | TreeNode = None

    def compose(self) -> ComposeResult:
        xml_root = self.xml_tree.getroot()
        self.expanded[id(xml_root)] = ""
        yield Header()
        yield Horizontal(
            Vertical(Tree("No Data Loaded", id="xml_tree"), id="left_pane"),
            VerticalScroll(id="right_pane"),
            id="main_ui_container",
        )
        yield Footer()

    def on_mount(self) -> None:
        self.load_tree()

    @on(Tree.NodeExpanded)
    def on_tree_node_expanded(self, event: Tree.NodeExpanded) -> None:
        """
        When a tree node is expanded, parse the newly shown leaves and make
        them expandable, if necessary.
        """
        xml_obj = event.node.data
        if id(xml_obj) not in self.expanded and xml_obj is not None:
            for top_level_item in xml_obj.getchildren():
                child = event.node.add_leaf(top_level_item.tag, data=top_level_item)
                if top_level_item.getchildren():
                    child.allow_expand = True
                else:
                    child.allow_expand = False
            self.expanded[id(xml_obj)] = ""

    @on(Tree.NodeSelected)
    def on_tree_node_selected(self, event: Tree.NodeSelected) -> None:
        """
        When a node in the tree control is selected, update the right pane to show
        the data in the XML, if any
        """
        xml_obj = event.node.data
        right_pane = self.query_one("#right_pane", VerticalScroll)
        right_pane.remove_children()
        self.selected_tree_node = event.node

        if xml_obj is not None:
            for child in xml_obj.getchildren():
                if child.getchildren():
                    continue
                text = child.text if child.text else ""
                data_input = DataInput(child, text)
                data_input.border_title = child.tag
                container = Horizontal(data_input)
                right_pane.mount(container)
            else:
                # XML object has no children, so just show the tag and text
                if getattr(xml_obj, "tag") and getattr(xml_obj, "text"):
                    if xml_obj.getchildren() == []:
                        data_input = DataInput(xml_obj, xml_obj.text)
                        data_input.border_title = xml_obj.tag
                        container = Horizontal(data_input)
                        right_pane.mount(container)

    @on(Input.Changed)
    def on_input_changed(self, event: Input.Changed) -> None:
        """
        When an XML element changes, update the XML object
        """
        xml_obj = event.input.xml_obj
        # self.notify(f"{xml_obj.text} is changed to new value: {event.input.value}")
        xml_obj.text = event.input.value

    def action_esc(self) -> None:
        """
        Close the dialog when the user presses ESC
        """
        self.dismiss()

    def action_add_node(self) -> None:
        """
        Add another node to the XML tree and the UI
        """

        # Show dialog and use callback to update XML and UI
        def add_node(result: tuple[str, str] | None) -> None:
            if result is not None:
                node_name, node_value = result
                self.update_xml_tree(node_name, node_value)

        self.app.push_screen(AddNodeScreen(), add_node)

    def action_preview(self) -> None:
        temp_directory = Path(tempfile.gettempdir())
        xml_path = temp_directory / "temp.xml"
        self.xml_tree.write(xml_path)
        self.app.push_screen(PreviewXMLScreen(xml_path))

    def action_save(self) -> None:
        self.xml_tree.write(r"C:\Temp\books.xml")
        self.notify("Saved!")

    def load_tree(self) -> None:
        """
        Load the XML tree UI with data parsed from the XML file
        """
        tree = self.query_one("#xml_tree", Tree)
        xml_root = self.xml_tree.getroot()
        self.expanded[id(xml_root)] = ""

        tree.reset(xml_root.tag)
        tree.root.expand()

        # If the root has children, add them
        if xml_root.getchildren():
            for top_level_item in xml_root.getchildren():
                child = tree.root.add(top_level_item.tag, data=top_level_item)
                if top_level_item.getchildren():
                    child.allow_expand = True
                else:
                    child.allow_expand = False

    def update_tree_nodes(self, node_name: str, node: ET.SubElement) -> None:
        """
        When adding a new node, update the UI Tree element to reflect the new element added
        """
        child = self.selected_tree_node.add(node_name, data=node)
        child.allow_expand = False

    def update_xml_tree(self, node_name: str, node_value: str) -> None:
        """
        When adding a new node, update the XML object with the new element
        """
        element = ET.SubElement(self.selected_tree_node.data, node_name)
        element.text = node_value
        self.update_tree_nodes(node_name, element)
Phew! That seems like a lot of code if you are new to coding, but a hundred and seventy lines of code or so really isn’t very much. Most applications take thousands of lines of code.
Just the same, breaking the code down into smaller chunks will aid in your understanding of what’s going on.
With that in mind, here’s the first chunk:
import lxml.etree as ET
import tempfile
from pathlib import Path

from .add_node_screen import AddNodeScreen
from .preview_xml_screen import PreviewXMLScreen

from textual import on
from textual.app import ComposeResult
from textual.containers import Horizontal, Vertical, VerticalScroll
from textual.screen import ModalScreen
from textual.widgets import Footer, Header, Input, Tree
from textual.widgets._tree import TreeNode
You have move imports here than you did in the main UI file. Here’s a brief overview:
- You import lxml to make parsing and editing XML easy.
- You use Python’s
tempfilemodule to create a temporary file for viewing the XML. - The
pathlibmodule is used the same way as before. - You have a couple of custom Textual screens that you will need to code up and import.
- The last six lines are all Textual imports for making this editor screen work.
The next step is to subclass the Inputwidget in such a way that it will store XML element data:
class DataInput(Input):
    """
    Create a variant of the Input widget that stores data
    """

    def __init__(self, xml_obj: ET.Element, *args, **kwargs) -> None:
        super().__init__(*args, **kwargs)
        self.xml_obj = xml_obj
Here you pass in an XML object and store it off in an instance variable. You will need this to make editing and displaying the XML easy.
The second class you create is the EditXMLScreen:
class EditXMLScreen(ModalScreen):
    BINDINGS = [
        ("ctrl+s", "save", "Save"),
        ("ctrl+a", "add_node", "Add Node"),
        ("p", "preview", "Preview"),
        ("escape", "esc", "Exit dialog"),
    ]
    CSS_PATH = "edit_xml_screens.tcss"

    def __init__(self, xml_path: Path, *args, **kwargs):
        super().__init__(*args, **kwargs)
        self.xml_tree = ET.parse(xml_path)
        self.expanded = {}
        self.selected_tree_node: None | TreeNode = None
The EditXMLScreenis a new screen that holds your XML editor. Here you add four keyboard bindings, a CSS file path and the __init__()method.
Your initialization method is used to create an lxml Element Tree instance. You also create an empty dictionary of expanded tree widgets and the selected tree node instance variable, which is set to None.
Now you’re ready to create your user interface:
def compose(self) -> ComposeResult:
    xml_root = self.xml_tree.getroot()
    self.expanded[id(xml_root)] = ""
    yield Header()
    yield Horizontal(
        Vertical(Tree("No Data Loaded", id="xml_tree"), id="left_pane"),
        VerticalScroll(id="right_pane"),
        id="main_ui_container",
    )
    yield Footer()

def on_mount(self) -> None:
    self.load_tree()
Fortunately, the user interface needed for editing XML is fairly straightforward:
- You create a new header to add a new title to the screen.
- You use a horizontally-oriented container to hold your widgets.
- Inside of the container, you have a tree control that holds the DOM of the XML on the left.
- On the right, you have a vertical scrolling container.
- Finally, you have a footer
You also set up the first item in your “expanded” dictionary, which is the root node from the XML.
Now you can write your first event handler for this class:
@on(Tree.NodeExpanded)
def on_tree_node_expanded(self, event: Tree.NodeExpanded) -> None:
    """
    When a tree node is expanded, parse the newly shown leaves and make
    them expandable, if necessary.
    """
    xml_obj = event.node.data
    if id(xml_obj) not in self.expanded and xml_obj is not None:
        for top_level_item in xml_obj.getchildren():
            child = event.node.add_leaf(top_level_item.tag, data=top_level_item)
            if top_level_item.getchildren():
                child.allow_expand = True
            else:
                child.allow_expand = False
        self.expanded[id(xml_obj)] = ""
When the user expands a node in the tree control, the on_tree_node_expanded()method will get called. You will extract the node’s data, if it has any. Assuming that there is data, you will then loop over any child nodes that are present.
For each child node, you will add a new leaf to the tree control. You check to see if the child has children too and set the allow_expandflag accordingly. At the end of the code, you add then XML object to your dictionary.
The next method you need to write is an event handler for when a tree node is selected:
@on(Tree.NodeSelected)
def on_tree_node_selected(self, event: Tree.NodeSelected) -> None:
    """
    When a node in the tree control is selected, update the right pane to show
    the data in the XML, if any
    """
    xml_obj = event.node.data
    right_pane = self.query_one("#right_pane", VerticalScroll)
    right_pane.remove_children()
    self.selected_tree_node = event.node

    if xml_obj is not None:
        for child in xml_obj.getchildren():
            if child.getchildren():
                continue
            text = child.text if child.text else ""
            data_input = DataInput(child, text)
            data_input.border_title = child.tag
            container = Horizontal(data_input)
            right_pane.mount(container)
        else:
            # XML object has no children, so just show the tag and text
            if getattr(xml_obj, "tag") and getattr(xml_obj, "text"):
                if xml_obj.getchildren() == []:
                    data_input = DataInput(xml_obj, xml_obj.text)
                    data_input.border_title = xml_obj.tag
                    container = Horizontal(data_input)
                    right_pane.mount(container)
Wben the user selects a node in your tree, you need to update the righthand pane with the node’s contents. To do that, you once again extract the node’s data, if it has any. If it does have data, you loop over its children and update the right hand pane’s UI. This entails grabbing the XML node’s tags and values and adding a series of horizontal widgets to the scrollable container that makes up the right pane of your UI.
If the XML object has no children, you can simply show the top level node’s tag and value, if it has any.
The next two methods you will write are as follows:
@on(Input.Changed)
def on_input_changed(self, event: Input.Changed) -> None:
    """
    When an XML element changes, update the XML object
    """
    xml_obj = event.input.xml_obj
    xml_obj.text = event.input.value

def on_save_file_dialog_dismissed(self, xml_path: str) -> None:
    """
    Save the file to the selected location
    """
    if not Path(xml_path).exists():
        self.xml_tree.write(xml_path)
        self.notify(f"Saved to: {xml_path}")
The on_input_changed() method deals with Inputwidgets which are your special DataInputwidgets. Whenever they are edited, you want to grab the XML object from the event and update the XML tag’s value accordingly. That way, the XML will always be up-to-date if the user decides they want to save it.
You can also add an auto-save feature which would also use the latest XML object when it is saving, if you wanted to.
The second method here, on_save_file_dialog_dismissed(), is called when the user dismisses the save dialog that is opened when the user presses CTRL+S. Here you check to see if the file already exists. If not, you create it. You could spend some time adding another dialog here that warns that a file exists and gives the option to the user whether or not to overwrite it.
Anyway, your next step is to write the keyboard shortcut action methods. There are four keyboard shortcuts that you need to create actions for.
Here they are:
def action_esc(self) -> None:
    """
    Close the dialog when the user presses ESC
    """
    self.dismiss()

def action_add_node(self) -> None:
    """
    Add another node to the XML tree and the UI
    """

    # Show dialog and use callback to update XML and UI
    def add_node(result: tuple[str, str] | None) -> None:
        if result is not None:
            node_name, node_value = result
            self.update_xml_tree(node_name, node_value)

    self.app.push_screen(AddNodeScreen(), add_node)

def action_preview(self) -> None:
    temp_directory = Path(tempfile.gettempdir())
    xml_path = temp_directory / "temp.xml"
    self.xml_tree.write(xml_path)
    self.app.push_screen(PreviewXMLScreen(xml_path))

def action_save(self) -> None:
    self.app.push_screen(SaveFileDialog(), self.on_save_file_dialog_dismissed)
The four keyboard shortcut event handlers are:
action_esc()– Called when the user pressed the “Esc” key. Exits the dialog.action_add_node()– Called when the user presses CTRL+A. Opens theAddNodeScreen. If the user adds new data, theadd_node()callback is called, which will then callupdate_xml_tree()to update the UI with the new information.action_preview()– Called when the user presses the “p” key. Creates a temporary file with the current contents of the XML object. Then opens a new screen that allows the user to view the XML as a kind of preview.action_save– Called when the user presses CTRL+S.
The next method you will need to write is called load_tree():
def load_tree(self) -> None:
    """
    Load the XML tree UI with data parsed from the XML file
    """
    tree = self.query_one("#xml_tree", Tree)
    xml_root = self.xml_tree.getroot()
    self.expanded[id(xml_root)] = ""

    tree.reset(xml_root.tag)
    tree.root.expand()

    # If the root has children, add them
    if xml_root.getchildren():
        for top_level_item in xml_root.getchildren():
            child = tree.root.add(top_level_item.tag, data=top_level_item)
            if top_level_item.getchildren():
                child.allow_expand = True
            else:
                child.allow_expand = False
The method above will grab the Treewidget and the XML’s root element and then load the tree widget with the data. You check if the XML root object has any children (which most do) and then loop over the children, adding them to the tree widget.
You only have two more methods to write. Here they are:
def update_tree_nodes(self, node_name: str, node: ET.SubElement) -> None:
    """
    When adding a new node, update the UI Tree element to reflect the new element added
    """
    child = self.selected_tree_node.add(node_name, data=node)
    child.allow_expand = False

def update_xml_tree(self, node_name: str, node_value: str) -> None:
    """
    When adding a new node, update the XML object with the new element
    """
    element = ET.SubElement(self.selected_tree_node.data, node_name)
    element.text = node_value
    self.update_tree_nodes(node_name, element)
These two methods are short and sweet:
update_tree_nodes()– When the user adds a new node, you call this method which will update the node in the tree widget as needed.update_xml_tree()– When a node is added, update the XML object and then call the UI updater method above.
The last piece of code you need to write is the CSS for this screen. Open up a text editor and create a new file called edit_xml_screens.tcss and then add the following code:
EditXMLScreen {
    Input {
        border: solid gold;
        margin: 1;
        height: auto;
    }
    Button {
        align: center middle;
    }
    Horizontal {
        margin: 1;
        height: auto;
    }
}
This CSS is similar to the other CSS file. In this case, you set the Input widget’s height to auto. You also set the margin and border for that widget. For the buttons, you tell Textual to center all of them. Finally, you also set the margin and height of the horizontal container, just like you did in the other CSS file.
Now you are ready to learn about the add node screen!
The Add Node Screen
When the user wants to add a new node to the XML, you will show an “add node screen”. This screen allows the user to enter a node (i.e., tag) name and value. The screen will then pass that new data to the callback which will update the XML object and the user interface. You have already seen that code in the previous section.
To get started, open up a new file named add_node_screen.pyand enter the following code:
from textual import on
from textual.app import ComposeResult
from textual.containers import Horizontal, Vertical
from textual.screen import ModalScreen
from textual.widgets import Button, Header, Footer, Input


class AddNodeScreen(ModalScreen):
    BINDINGS = [
        ("escape", "esc", "Exit dialog"),
    ]
    CSS_PATH = "add_node_screen.tcss"

    def __init__(self, *args, **kwargs):
        super().__init__(*args, **kwargs)
        self.title = "Add New Node"

    def compose(self) -> ComposeResult:
        self.node_name = Input(id="node_name")
        self.node_name.border_title = "Node Name"
        self.node_value = Input(id="node_value")
        self.node_value.border_title = "Node Value"

        yield Vertical(
            Header(),
            self.node_name,
            self.node_value,
            Horizontal(
                Button("Save Node", variant="primary", id="save_node"),
                Button("Cancel", variant="warning", id="cancel_node"),
            ),
            Footer(),
            id="add_node_screen_ui",
        )

    @on(Button.Pressed, "#save_node")
    def on_save(self) -> None:
        self.dismiss((self.node_name.value, self.node_value.value))

    @on(Button.Pressed, "#cancel_node")
    def on_cancel(self) -> None:
        self.dismiss()

    def action_esc(self) -> None:
        """
        Close the dialog when the user presses ESC
        """
        self.dismiss()
Following is an overview of each method of the code above:
__init__()– Sets the title of the screen.compose()– Creates the user interface, which is made up of twoInputwidgets, a “Save” button, and a “Cancel” button.on_save()-Called when the user presses the “Save” button. This will save the data entered by the user into the two inputs, if any.on_cancel()– Called when the user presses the “Cancel” button. If pressed, the screen exits without saving.action_esc()– Called when the user presses the “Esc” key. If pressed, the screen exits without saving.
That code is concise and straightforward.
Next, open up a text editor or use your IDE to create a file named add_node_screen.tcsswhich will contain the following CSS:
AddNodeScreen {
    align: center middle;
    background: $primary 30%;

    #add_node_screen_ui {
            width: 80%;
            height: 40%;
            border: thick $background 70%;
            content-align: center middle;
            margin: 2;
        }

    Input {
        border: solid gold;
        margin: 1;
        height: auto;
    }

    Button {
        margin: 1;
    }

    Horizontal{
        height: auto;
        align: center middle;
    }
}
Your CSS functions as a way to quickly style individual widgets or groups of widgets. Here you set it up to make the screen a bit smaller than the screen underneath it (80% x 40%) so it looks like a dialog.
You set the border, height, and margin on your inputs. You add a margin around your buttons to keep them slightly apart. Finally, you add a height and alignment to the container.
You can try tweaking all of this to see how it changes the look and feel of the screen. It’s a fun way to explore, and you can do this with any of the screens you create.
The next screen to create is the XML preview screen.
Adding an XML Preview Screen
The XML Preview screen allows the user to check that the XML looks correct before they save it. Textual makes creating a preview screen short and sweet.
Open up your Python IDE and create a new file named preview_xml_screen.pyand then enter the following code into it:
from textual import on
from textual.app import ComposeResult
from textual.containers import Center, Vertical
from textual.screen import ModalScreen
from textual.widgets import Button, Header, TextArea


class PreviewXMLScreen(ModalScreen):
    CSS_PATH = "preview_xml_screen.tcss"

    def __init__(self, xml_file_path: str, *args: tuple, **kwargs: dict) -> None:
        super().__init__(*args, **kwargs)
        self.xml_file_path = xml_file_path
        self.title = "Preview XML"

    def compose(self) -> ComposeResult:
        with open(self.xml_file_path) as xml_file:
            xml = xml_file.read()
        text_area = TextArea(xml)
        text_area.language = "xml"
        yield Header()
        yield Vertical(
            text_area,
            Center(Button("Exit Preview", id="exit_preview", variant="primary")),
            id="exit_preview_ui",
        )

    @on(Button.Pressed, "#exit_preview")
    def on_exit_preview(self, event: Button.Pressed) -> None:
        self.dismiss()
There’s not a lot here, so you will go over the highlights like you did in the previous section:
__init__()– Initializes a couple of instance variables:xml_file_path– Which is a temporary file pathtitle– The title of the screen
compose()– The UI is created here. You open the XML file and read it in. Then you load the XML into aTextAreawidget. Finally, you tell Textual to use a header, the text area widget and an exit button for your interface.on_exit_preview()– Called when the user presses the “Exit Preview” button. As the name implies, this exits the screen.
The last step is to apply a little CSS. Create a new file named preview_xml_screen.tcssand add the following snippet to it:
PreviewXMLScreen {
    Button {
        margin: 1;
    }
}
All this CSS does is add a margin to the button, which makes the UI look a little nicer.
There are three more screens yet to write. The first couple of screens you will create are the file browser and warning screens.
Creating the File Browser and Warning Screens
The file browser is what the user will use to find an XML file that they want to open. It is also nice to have a screen you can use for warnings, so you will create that as well.
For now, you will call this file file_browser_screen.pybut you are welcome to separate these two screens into different files. The first half of the file will contain the imports and the WarningScreenclass.
Here is that first half:
from pathlib import Path

from textual import on
from textual.app import ComposeResult
from textual.containers import Center, Grid, Vertical
from textual.message import Message
from textual.screen import Screen
from textual.widgets import Button, DirectoryTree, Footer, Label, Header


class WarningScreen(Screen):
    """
    Creates a pop-up Screen that displays a warning message to the user
    """

    def __init__(self, warning_message: str) -> None:
        super().__init__()
        self.warning_message = warning_message

    def compose(self) -> ComposeResult:
        """
        Create the UI in the Warning Screen
        """
        yield Grid(
            Label(self.warning_message, id="warning_msg"),
            Button("OK", variant="primary", id="ok_warning"),
            id="warning_dialog",
        )

    def on_button_pressed(self, event: Button.Pressed) -> None:
        """
        Event handler for when the OK button - dismisses the screen
        """
       self.dismiss()
       event.stop()
The warning screen is made up of two widgets: a label that contains the warning message and an “OK” button. You also add a method to respond to the buton being pressed. You dismiss the screen here and stop the event from propagating up to the parent.
The next class you need to add to this file is the FileBrowserclass:
class FileBrowser(Screen):
    BINDINGS = [
        ("escape", "esc", "Exit dialog"),
    ]

    CSS_PATH = "file_browser_screen.tcss"

    class Selected(Message):
        """
        File selected message
        """

        def __init__(self, path: Path) -> None:
            self.path = path
            super().__init__()

    def __init__(self) -> None:
        super().__init__()
        self.selected_file = Path("")
        self.title = "Load XML Files"

    def compose(self) -> ComposeResult:
        yield Vertical(
            Header(),
            DirectoryTree("/"),
            Center(
                Button("Load File", variant="primary", id="load_file"),
            ),
            id="file_browser_dialog",
        )

    @on(DirectoryTree.FileSelected)
    def on_file_selected(self, event: DirectoryTree.FileSelected) -> None:
        """
        Called when the FileSelected Message is emitted from the DirectoryTree
        """
        self.selected_file = event.path

    def on_button_pressed(self, event: Button.Pressed) -> None:
        """
        Event handler for when the load file button is pressed
        """
        event.stop()

        if self.selected_file.suffix.lower() != ".xml" and self.selected_file.is_file():
            self.app.push_screen(WarningScreen("ERROR: You must choose a XML file!"))
            return

        self.post_message(self.Selected(self.selected_file))
        self.dismiss()

    def action_esc(self) -> None:
        """
        Close the dialog when the user presses ESC
        """
        self.dismiss()
The FileBrowserclass is more complicated because it does a lot more than the warning screen does. Here’s a listing of the methods:
__init__()– Initializes the currently selected file to an empty path and sets the title for the screen.compose()– Creates the UI. This UI has a header, aDirectoryTreefor browsing files and a button for loading the currently selected file.on_file_selected()– When the user selected a file in the directory tree, you grab the path and set theselected_fileinstance variable.on_button_pressed()– When the user presses the “Load File” button, you check if the selected file is the correct file type. If not, you should a warning screen. If the file is an XML file, then you post a custom message and close the screen.action_esc()– Called when the user presses theEsckey. Closes the screen.
The last item to write is your CSS file. As you might expect, you should name it file_browser_screen.tcss. Then put the following CSS inside of the file:
FileBrowser {
    #file_browser_dialog {
            width: 80%;
            height: 50%;
            border: thick $background 70%;
            content-align: center middle;
            margin: 2;
            border: solid green;
        }
    Button {
        margin: 1;
        content-align: center middle;
    }
}
The CSS code here should look pretty familiar to you. All you are doing is making the screen look like a dialog and then adding a margin and centering the button.
The last step is to create the file save screen.
Creating the File Save Screen
The file save screen is similar to the file browser screen with the main difference being that you are supplying a new file name that you want to use to save your XML file to.
Open your Python IDE and create a new file called save_file_dialog.pyand then enter the following code:
from pathlib import Path

from textual import on
from textual.app import ComposeResult
from textual.containers import Vertical
from textual.screen import Screen
from textual.widgets import Button, DirectoryTree, Footer, Header, Input, Label


class SaveFileDialog(Screen):
    CSS_PATH = "save_file_dialog.tcss"

    def __init__(self) -> None:
        super().__init__()
        self.title = "Save File"
        self.root = "/"

    def compose(self) -> ComposeResult:
        yield Vertical(
            Header(),
            Label(f"Folder name: {self.root}", id="folder"),
            DirectoryTree("/"),
            Input(placeholder="filename.txt", id="filename"),
            Button("Save File", variant="primary", id="save_file"),
            id="save_dialog",
        )

    def on_mount(self) -> None:
        """
        Focus the input widget so the user can name the file
        """
        self.query_one("#filename").focus()

    def on_button_pressed(self, event: Button.Pressed) -> None:
        """
        Event handler for when the load file button is pressed
        """
        event.stop()
        filename = self.query_one("#filename").value
        full_path = Path(self.root) / filename
        self.dismiss(f"{full_path}")

    @on(DirectoryTree.DirectorySelected)
    def on_directory_selection(self, event: DirectoryTree.DirectorySelected) -> None:
        """
        Called when the DirectorySelected message is emitted from the DirectoryTree
        """
        self.root = event.path
        self.query_one("#folder").update(f"Folder name: {event.path}")
The save file dialog code is currently less than fifty lines of code. Here is a breakdown of that code:
__init__()– Sets the title of the screen and the default root folder.compose()– Creates the user interface, which consists of a header, a label (the root), the directory tree widget, an input for specifying the file name, and a “Save File” button.on_mount()– Called automatically by Textual after thecompose()method. Sets the input widget as the focus.on_button_pressed()– Called when the user presses the “Save File” button. Grabs the filename and then create the full path using the root + filename. Finally, you send that full path back to the callback function viadismiss().on_directory_selection()– Called when the user selects a directory. Updates therootvariable to the selected path as well as updates the label so the user knows which path is selected.
The last item you need to write is the CSS file for this dialog. You will need to name the file save_file_dialog.tcssand then add this code:
SaveFileDialog {
    #save_dialog {
            width: 80%;
            height: 50%;
            border: thick $background 70%;
            content-align: center middle;
            margin: 2;
            border: solid green;
        }
    Button {
        margin: 1;
        content-align: center middle;
    }
}
The CSS code above is almost identical to the CSS you used for the file browser code.
When you run the TUI, you should see something like the following demo GIF:
Wrapping Up
You have now created a basic XML editor and viewer using Python and Textual. There are lots of little improvements that you can add to this code. However, those updates are up to you to make.
Have fun working with Textual and create something new or contribute to a neat Textual project yourself!
Get the Code
The code in this tutorial is based on version 0.2.0 of BoomslangXML TUI. You can download the code from GitHub or from the following links: