
What are Jupyter widgets? A widget is an “eventful python object” that in the case of Jupyter Notebook, resides in the browser and is a user interface element, such as a slider or textbox. Jupyter supports a fairly wide array of widgets including the following:
- Numeric
- Boolean
- Selection
- String
- Image
- Button
- Output
- Animation
- Date picker
- Color picker
- Controller (i.e. game controller)
- Layout
We won’t cover every type of widget in this article, but we will get to see a fairly wide range of them in action. For a full list you can check out the documentation. Or you can run the following code in your Notebook:
import ipywidgets as widgets

print(dir(widgets))
If you have ever created a user interface in the past, then you probably already understand what a widget is. If you haven’t, then let’s just take a second to define what they are for.
A widget is used to create an interactive graphical user interface for your user. The widgets synchronize stateful and stateless information between Python and Javascript.
We looked briefly at how to create widgets using the interact and interactive functions in the previous article. In this tutorial we will create the widgets directly and learn more about how they work.
Creating a Widget
A widget can be created really easily. Let’s create a simple slider for demonstration purposes. Create a new Jupyter Notebook and put the following code into a cell:
import ipywidgets as widgets

widgets.IntSlider()
When you run the cell, you should see something like this:
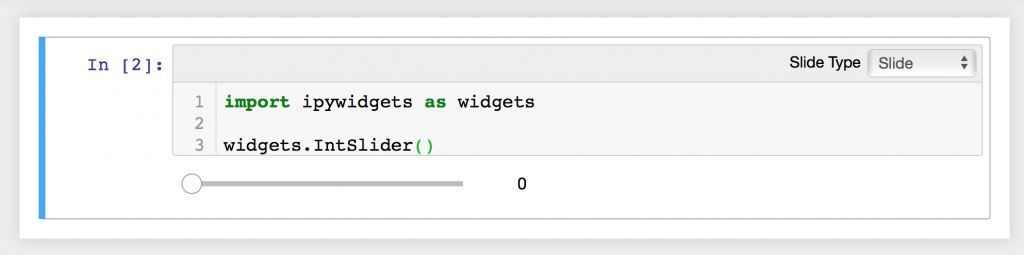
As you can see, the default value is zero for the slider. If you want to save the widget to a variable, then you will need to tell Jupyter to show the widget using the display function:
import ipywidgets as widgets
from IPython.display import display

btn = widgets.Button(description='Press Me')
display(btn)
Here we add the extra import that we need to display a widget and we create a simple Button. Note that we had to specify its description so that the button would have a label. Finally we called the display function and passed it the widget object. The result looks like this:

Now let’s back up a second and create that slider again, but this time around we will use display to show it twice:
import ipywidgets as widgets
from IPython.display import display

btn = widgets.IntSlider()
display(btn)
display(btn)
If you put the code above into a cell in your Notebook and run it, you should see two sliders:

Try moving around one of the sliders. You will quickly discover that when you move one slider, the other slider also moves. The reason that this happens is that we only create ONE slider object. The actual visible widgets are both pointing to the same object underneath, so when you move one you are effectively moving the other. You can think of these two sliders are two views to the same object. Of course, if you had created two IntSliders and assigned them to unique variable names, then you could move them independently of each other.
Closing a Widget
You can close a widget by calling its close() method. If you want to remove the widget, just clear the cell.
Properties and Keys of a Widget
Jupyter widgets follow a set of rules for their properties. If you want to get a full listing of widgets properties and methods, you can use Python’s
dir()
function to introspect the widget for you:
dir(btn)
Let’s say you put the code above in a new cell just below the cell that contains the code for your `IntSlider` widget. If you ran this new cell, you would get output like this:

Try adjusting the slider to something above zero. Then create a new cell and enter the following code:
btn.value
When you run this, it will print out the current value of the slider. Widgets also have keys, which are such things as `description`, `min`, and `max` and `disabled`. For the full list of a widget’s keys, you can consult the documentation for the widget, read the source or just run this:
btn.keys
Also worth mentioning is that you can also set a property to a new value. So if you wanted to set the slider to a new value and add a description, you could do the following:
btn.value = 50
btn.description = 'Hello slider'
If you run this code, you will see the slider update its value and description.
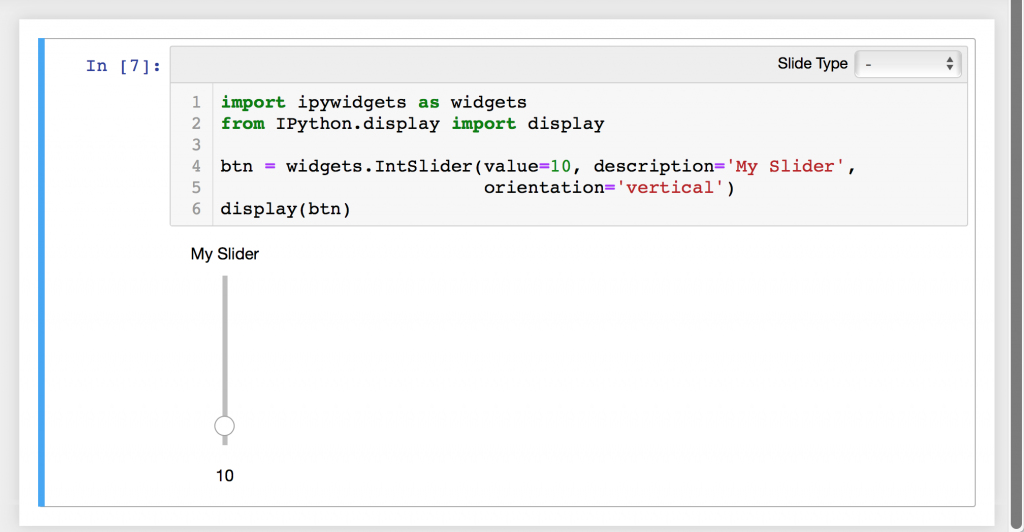
Widgets also support setting properties when you instantiate the widget. For example, if we wanted to, we could set a few of our Slider’s properties when we create it:
import ipywidgets as widgets
from IPython.display import display

btn = widgets.IntSlider(value=10, description='My Slider',
                        orientation='vertical')
display(btn)
When you run this code, you will see that the widget looks a bit different:
Linking Two Widgets
Some Jupyter widgets can be linked together. For example, you can link a FloatText widget to a FloatSlider widget. What this means is that when one widget is updated, the other will be too. This is known as “synchronization of attributes”. Let’s take a look at a simple example:
text = widgets.FloatText()
slider = widgets.FloatSlider()
display(text,slider)

mylink = widgets.jslink((text, 'value'), (slider, 'value'))
Here we create two widgets and display them both. Then we call widgets.jslink and tell it to link the value of the text and slider together. When you use the jslink method, you are linking the widgets from the client side. This makes the widgets sync up more robustly because they will be using the local machine’s hardware. You can also use jsdlink, which will create a unidirectional link between two widgets on the client side. What that means is that you can make one of the two widgets affect the second widget whereas the second widget will NOT affect the first.
Try changing the example above to use jsdlink like we do below:
text = widgets.FloatText()
slider = widgets.FloatSlider()
display(text,slider)

mylink = widgets.jsdlink((text, 'value'), (slider, 'value'))
Now try editing each widget’s value and see how they interact. It’s hard to demonstrate in the book but basically when you change the text widget it will change the slider to match. However if you change the slider’s value, the text control won’t change.
There are also two other methods you can use to link two widgets together:
- link
- dlink
These methods work in the same way as jslink and jsdlink respectively, except that they will talk to the server so you might experience some latency when using them. Frankly on your local machine, you probably won’t see much difference between the two.
Finally I want to point out that you can also unlink the widgets by calling the link’s unlink method:
mylink.unlink()
You can try this out by adding this code to the end of the cell where you created the linked widgets. If you do add it and re-run the cell, then you will find that the two widgets are no longer linked together.
Events
Linking widgets is closely related to widget events. An event occurs when you interact with a widget. For example, when you push a button, that is known as a click event. Let’s look at an example of how this might work using a button widget.
import ipywidgets as widgets
from IPython.display import display
btn = widgets.Button(description='Test')
display(btn)
def my_event_handler(btn_object):
print('You pressed the {} button!'.format(btn_object.description))
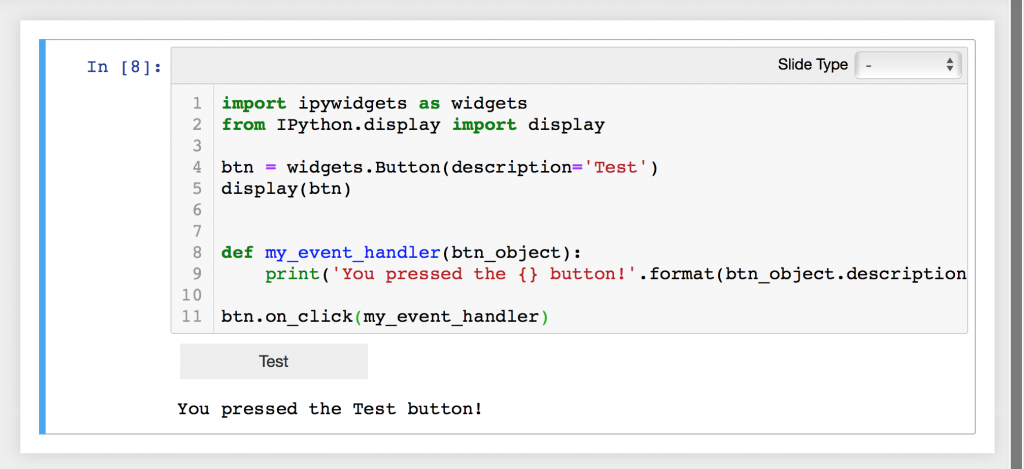
btn.on_click(my_event_handler)
Here we import the various bits and pieces we need to use widgets and display them. Then we create a simple button and a function that is named my_event_handler. This is the event handler which is what you would bind your widget’s event to. To actually bind your button’s click event to this handler, you must call on_click and pass it the function that you want it bound to. You will note that the event handler accepts an argument implicitly, which is the button object itself.
This allows you to access the button’s properties, so in this case I went ahead and told it to print out the label of the button. The following is a screenshot of what my code and button looked like when I ran it after pressing the button:
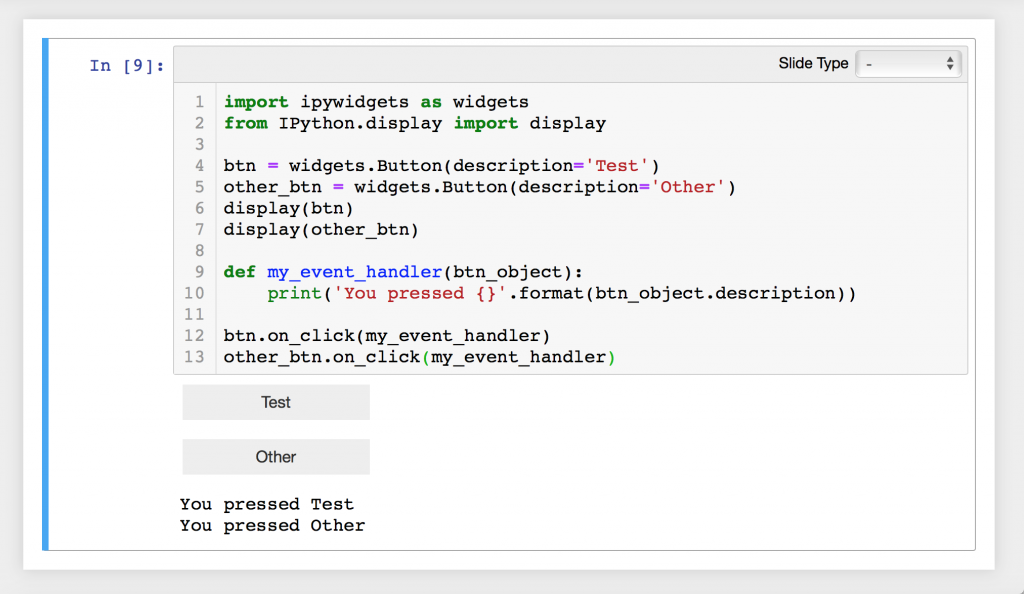
What this also allows you to do is to bind multiple buttons to the same event handler. Here’s how you might do that:
import ipywidgets as widgets
from IPython.display import display

btn = widgets.Button(description='Test')
other_btn = widgets.Button(description='Other')
display(btn)
display(other_btn)

def my_event_handler(btn_object):
    print('You pressed {}'.format(btn_object.description))

btn.on_click(my_event_handler)
other_btn.on_click(my_event_handler)
In this code, we create a second button called other_btn with a different label and bind it to the same event handler as the other button. Now you can try pressing the each button a few times and see how they behave. Here’s an example session:
You can do this type of event binding with other types of widget events. You will need to look at the documentation for the widget or the source of the widget to figure out what events it supports.
Speaking of the documentation, it also mentions something that Jupyter calls Traitlet events. These are IPython traitlets which basically give you a different method of binding an event to a function using the observe method. To get an idea of how you might use a traitlet, let’s run the following code in our Jupyter Notebook:
print(btn.observe.__doc__)
When I ran this code, I got the following output:
Setup a handler to be called when a trait changes.

        This is used to setup dynamic notifications of trait changes.

        Parameters
        ----------
        handler : callable
            A callable that is called when a trait changes. Its
            signature should be ``handler(change)``, where ``change`` is a
            dictionary. The change dictionary at least holds a 'type' key.
            * ``type``: the type of notification.
            Other keys may be passed depending on the value of 'type'. In the
            case where type is 'change', we also have the following keys:
            * ``owner`` : the HasTraits instance
            * ``old`` : the old value of the modified trait attribute
            * ``new`` : the new value of the modified trait attribute
            * ``name`` : the name of the modified trait attribute.
        names : list, str, All
            If names is All, the handler will apply to all traits.  If a list
            of str, handler will apply to all names in the list.  If a
            str, the handler will apply just to that name.
        type : str, All (default: 'change')
            The type of notification to filter by. If equal to All, then all
            notifications are passed to the observe handler.
So how does this work? Basically you call observe with the name of the function that you want to bind to as well as which traits you want to “observe”. You can pass in a list of strings, set it to “All” or pass in a singular string. The documentation has a good example, but I am going to take it and expand it slightly to become the following:
int_range = widgets.IntSlider()
display(int_range)

def on_value_change(change):
    print(change)
    print(change['new'])

int_range.observe(on_value_change, names='value')
The difference between this and the one you will find in the documentation is that I am printing out the change object too. This will tell us what we are dealing with. In this case, the output when you change the slider looks like this:
{'owner': IntSlider(value=2), 'new': 2, 'old': 0, 'name': 'value', 'type': 'change'}
2
That tells us that the change argument is a dictionary of values and that the key new will give us the new value of the slider. So when we tell Jupyter to observe the value string, it will send in a dictionary of values. Interestingly this dictionary also contains the old value of the slider in addition to the new value. This can be useful to know in other widgets if you need to implement something like undo / redo, for example.
Layout
Jupyter widgets also have a layout attribute that they expose which allows you to set a number of CSS properties that you may use to control how widgets are laid out. These properties include size, display, box model, positioning and more. You can use the layout feature to make your widgets change sizes based on the available space.
Let’s look at a simple example:
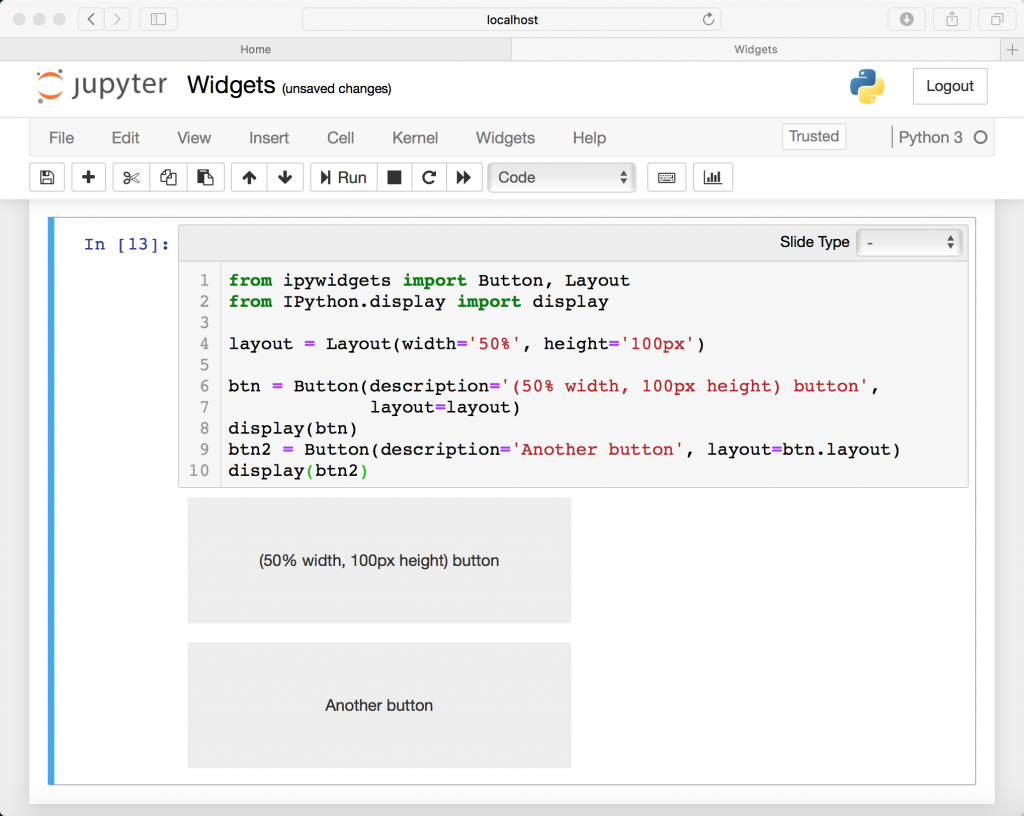
from ipywidgets import Button, Layout
from IPython.display import display

layout = Layout(width='50%', height='100px')

btn = Button(description='(50% width, 100px height) button',
             layout=layout)
display(btn)
Here we import our Button and a Layout. We set up the Layout such that it will make the widget take up 50% of the available width and 100 pixels high. Then we set the button’s layout argument to the layout that we just created. This is what the result looks like:

You can apply layouts by creating a layout instance like we did in the previous example or you can have a widget use another widget’s layout directly. To demonstrate, let’s add the following code to the bottom of the cell that we just created in the previous example:
btn2 = Button(description='Another button', layout=btn.layout)
display(btn2)
Here we set this new button’s layout to btn.layout, which basically makes our new button use the same layout object that the original button is using. You should end up seeing the button’s like this:
Styling
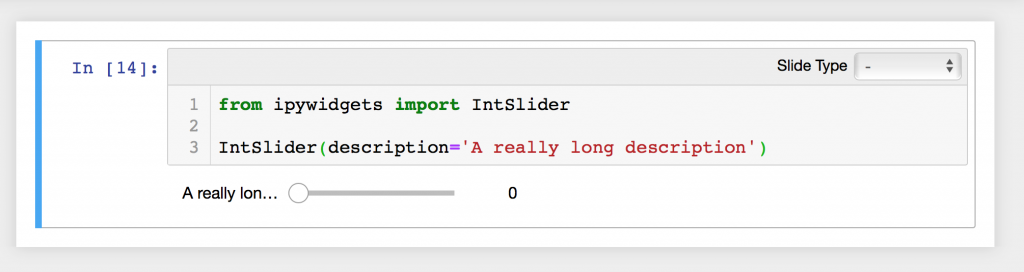
Interestingly, some widgets allow you to put in a description that is too long to be shown.
from ipywidgets import IntSlider

IntSlider(description='A really long description')
When you run this code, you will find that Jupyter cuts off some of the text:
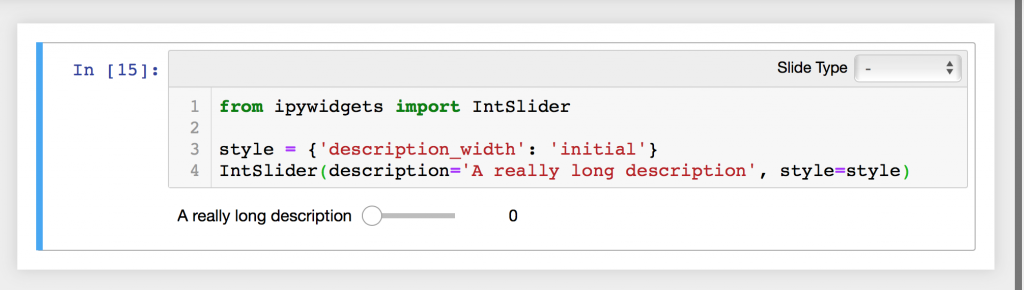
You can get around this issue by applying a style. The style to use in this case would look like this:
style = {'description_width': 'initial'}
Oddly enough, the documentation on Jupyter styles is pretty much non-existent. Looking at the source code in widget_int.py, it appears that the value, initial, refers to the initial label width. So when you create a style that has description_width as the key and set it to initial, you are, in effect, telling Jupyter to use the widget label’s string length as its width. To apply the style, you can just do the following:
from ipywidgets import IntSlider

style = {'description_width': 'initial'}
IntSlider(description='A really long description', style=style)
And now your widget will look like this:
Of course, the problem with this solution is that now your slider looks too small. We can solve that issue by using a helper function!
Arranging Widgets
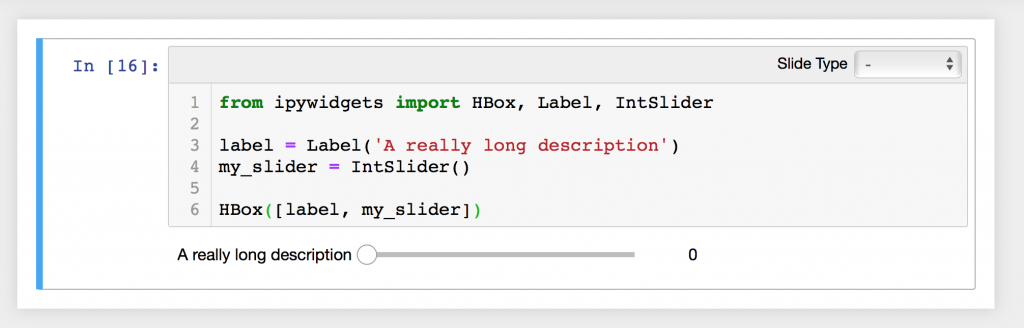
There are some helper functions like HBox and VBox that you can use for combining widget and laying them out visually. The HBox will add widgets to it one at a time horizontally. You can think of it as lining up individual pieces in a horizontal line from left-to-right. Let’s use an HBox and a Label widget to solve our problem:
from ipywidgets import HBox, Label, IntSlider

label = Label('A really long description')
my_slider = IntSlider()

HBox([label, my_slider])
Here we import the pieces we need, create a couple of widgets and then add them to our HBox. The result is as follows:
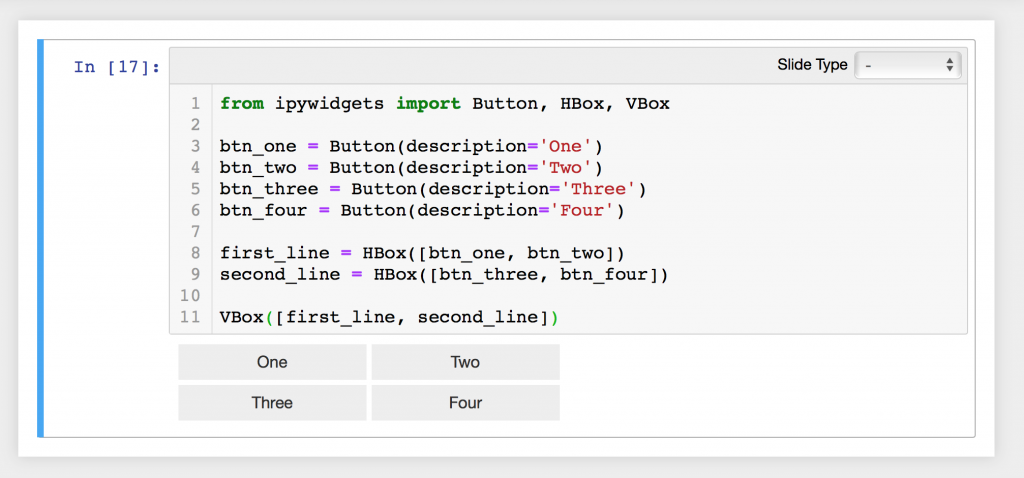
As you might expect, you can use a combination of HBox and VBox layouts to make complex layouts of your widgets. For example, you could add a couple of widgets to one HBox and a couple more to a second HBox and then add both HBoxes to a VBox to create a grid. Let’s go ahead and do that so you can see how that might work.
from ipywidgets import Button, HBox, VBox

btn_one = Button(description='One')
btn_two = Button(description='Two')
btn_three = Button(description='Three')
btn_four = Button(description='Four')

first_line = HBox([btn_one, btn_two])
second_line = HBox([btn_three, btn_four])

VBox([first_line, second_line])
Here we create four buttons and two HBoxes. The HBoxes each hold two buttons apiece. Finally we add the HBoxes to the VBox and this is what we end up with:
in the documentation, so I will leave that one for you to read as an exercise. I also want to mention that there is one other widget for creating layouts called the GridBox.
In my experience using wxPython, a cross-platform desktop user interface toolkit, I have found that using VBox and HBox type containers is more than enough for creating complex layouts of my widgets and the more advanced layout tools tend to make things more difficult unless you are already planning to do a grid-like interface. You are more than welcome to give these other types of layouts a try as they definitely have their place.
Wrapping Up
In this chapter we learned a lot about how to create and use Jupyter Widgets. We also learned how we can display, style and arrange them. There are lots of other things you can learn about widgets on by checking out the documentation on the topic or reading a few tutorials on the web. For example, Jupyter supports the ability for you to create your own custom widgets. It also supports the use of asynchronous widgets. I highly recommend using widgets in your Notebooks to give them some pizazz and to make them more useful too!
Pingback: Getting Started with JupyterLab | The Mouse Vs. The Python
Pingback: Mike Driscoll: Getting Started with JupyterLab – Cebu Scripts