
JupyterLab is the latest package from Project Jupyter. In some ways, it is kind of a replacement for Jupyter Notebook. However the Jupyter Notebook is a separate project from JupyterLab. I like to think of JupyterLab as a kind of web-based Integrated Development Environment that you an use to to work with Jupyter Notebooks as well as using terminals, text editors and code consoles. You might say JupyterLab is a more powerful version of Jupyter Notebook.
Anyway, here are a few of the things that JupyterLab is capable of:
- Code Consoles – These are coding scratchpads that you can use for running code interactively, kind of like Python’s IDLE
- Kernel-backed documents – These allow you to enable code in any text file (Markdown, Python, R, etc) that can then be run in the Jupyter kernel
- Mirrored Notebook cell outputs – This let’s you create simple dashboards
- Multiple views of the same document – Gives you the ability to live edit documents and see the results in real-time
JupyterLab will allow you to view and handle multiple types of data. You can also display rich output from these formats using various visualizations or Markdown.
For navigation, you can use customizable keyboard shortcuts or key maps from vim, emacs and even SublimeText.
You can add new behavior to your JupyterLab instance via extensions. This includes theming support, file editors and more.
Installation
You can use conda, pip or pipenv to install JupyterLab.
conda
If you are an Anaconda user, then you can use conda for installation purposes by using the following command:
conda install -c conda-forge jupyterlab
pip
If you prefer using Python’s native installer, pip, then this is the command you want:
pip install jupyterlab
Note: If you are using pip install –user, then you will need to add the user-level “bin” directory to your PATH environment variable to be able to launch jupyterlab.
pipenv
The pipenv tool is a new package that can be used to create a Python virtual environment and download a package into it. If you happen to have it installed, then you can use the following two commands to get JupyterLab:
pipenv install jupyterlab
pipenv shell
Note that calling the shell command is required if you want to launch JupyterLab from within the virtualenv that you installed it into.
Running JupyterLab
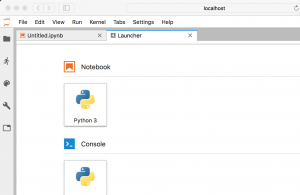
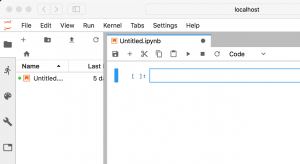
Now that we have JupyterLab installed, we should try running it. You can use either jupyter-lab or jupyter lab to run it. When I ran either of these commands, I got the following initial web application:
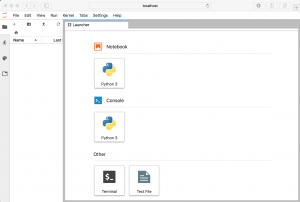
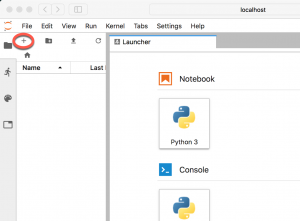
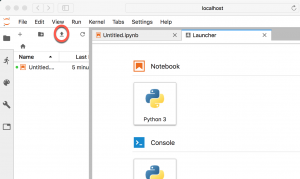
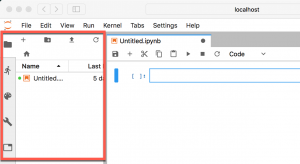
The tab on the right is called the Launcher. This is one place you can go to start a new Notebook, Code Console, Terminal or Text File. New documents are opened as new tabs. You will note that when you create a new Notebook or other item that the Launcher disappears. If you would like to open a second document, just click the “+” button on the left, which I have circled below:
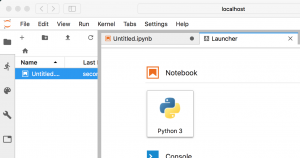
Let’s open a Notebook and then click the plus button. If you do that, your screen should look something like this:
You can also create new items by using the **Menu** that runs along the top of the screen. Just go to **File** –> **New** and then choose the type of item you would like to create. Most of the menu items should be familiar to you if you have used Jupyter Notebook. There are some new entries here that are specific to JupyterLab however. For example:
- New Launcher – Launches a new launcher
- Open From Path – Open a document from a path other than the one you started in
- Save Notebook As… – Let’s you save the currently selected Notebook with a new filename
- Export Notebook As… – Let’s you export your Notebook to a different format, such as PDF, Markdown, etc
Explore the menu and see what else you can find. It’s pretty self-explanatory.
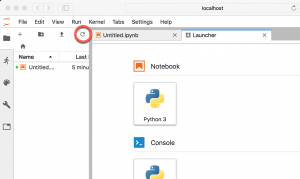
The File Browser
The tree on the left is known as the File Browser. It shows you the files that are available to you from the location that you launched JupyterLab from. Just click the folder icon to make the tree collapse so that the tab can fill the browser:
You will note that you can create new folders in the File Browser as well by clicking the folder+ icon (circled below):

If you need to add a file to JupyterLab from another location on your computer, then you will want to click on the Upload button:
When you do, it will pop open a File Open dialog:
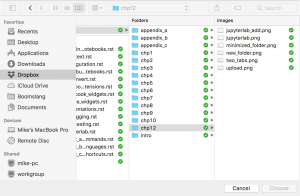
Just use this as you would if you were opening a file in another program. Just remember that instead of opening a file, you are “uploading” or “copying” it to your JupyterLab workspace.
Finally there is a refresh button that you can use to refresh the workspace if you happened to copy a file into the workspace by using a method other than the Upload button:
Special URLs
As with Jupyter Notebook, JupyterLab allows users to copy URLS into the browser to open a specific Notebook or file. However JupyterLab has also added the ability to manage workspaces and file navigation via URLs.
For example, if you want to use file navigation, you can use the special keyword tree to do so. Here is an example URL using an untitled Notebook:
http://localhost:8888/lab/tree/Untitled.ipynb
If you were to try this out, you would see the normal Jupyter Notebook interface instead of seeing the Notebook inside of JupyterLab.
Workspaces
The default workspace doesn’t have a name, but it can be found at /lab. If you would like to clone your workspace, you can use the following format:
http://localhost:8888/lab/workspaces/test?clone
This will copy your current workspace into a workspace named test. If you want to copy the test workspace into your default workspace, the URL would look like this:
http://localhost:8888/lab?clone=test
You can also reset a workspace using the reset URL parameter. When you reset a workspace, you are clearing it of its contents. Here is an example of resetting the default workspace:
http://localhost:8888/lab/workspaces/lab?reset
The Cell Inspector
Let’s create a Notebook inside of our JupyterLab instance. Go to the Launcher and choose a kernel. You will have Python 2 or Python 3 by default. Once you have created it, you should see a new tab named “Untitled.ipynb” like this:
As you can see, we have a Notebook with a single cell. Let’s add the following code to the slide:
def adder(a, b):
   return a + b

adder(2, 3)
Now let’s click the little wrench that is in the toolbar on the left. Here’s a screenshot with the button circled:
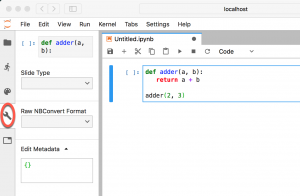
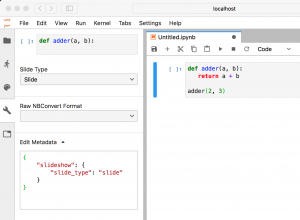
When you click that wrench, your screen should look like the above. This is called the Cell Inspector. This is where you can set up your Notebook for presentation purposes. You can set which cells are slides or sub-slides. Pretty much anything that we talked about in Chapter 9 relating to the Notebook itself can also be done here. You will also note that the Cell Inspector will display any metadata that JupyterLab / Notebook is adding to the cells.
If you would like to see that in action, then try setting your first cell to a Slide. Now you should see the Metadata field populated like this:
Using Files
You can use JupyterLab’s File Browser and File menu to work with files and directories on your system. This allows you to open, create, delete, rename, download / upload, copy and share files and directories. You can find the File Browser in the left sidebar:
If you have files in your browser, you can open it by just double-clicking the file as you would normally do in your system’s file browser. You may also drag a file from the File Browser into the work area (on the right) which will cause it to open.
Many of the file types that JupyterLab supports also have multiple viewers and editors. You can open a Markdown file in an editor or view it as HTML, for example. If you want to open the file in a non-default viewer/editor, just right-click the file and choose “Open With…” from the context menu:

Note that you can open a single file into multiple viewers/editors and they will remain in sync.
The Text Editor
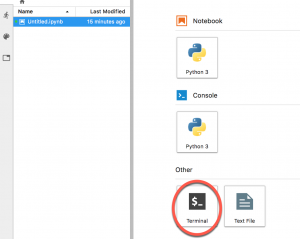
JupyterLab comes with a built-in text editor that you can use to create or open text files. Open up the Launcher and instead of creating a Notebook, go to the bottom of the Launcher and create a text file.

It will create an untitled.txt file by default. But you can go to the File menu and use “Save As…” to save it as something else. This allows you to create Python files, Markdown and pretty much anything else you would like to. It even provides syntax highlighting for some file types, although code completion is not supported. You may also create files via the File menu.
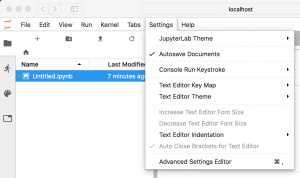
The text editor also supports configurable indentation (tabs vs. spaces), key maps and basic theming. Just go to the Settings menu to view or edit them:
If you would like to edit an existing text file, all you need to do is double-click it in the File Browser.
Interactive Code Consoles
One of the newer features to JupyterLab is the Code Console, which is basically a REPL in your browser. It will let you run code interactively in the currently selected kernel. The “cells” of a code console show the order in which the code was run. To create a new Code Console, click the “+” button in the File Browser and select the kernel of your choice:

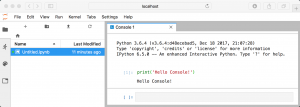
Enter some code. Here’s an example if you are having some trouble thinking of any on your own:
print('Hello Console!')
Now press Shift+Enter to run the code. You should see the following output if everything worked correctly:
Code completion works via the Tab key. You can also bring up tooltips by pressing Shift+Tab.
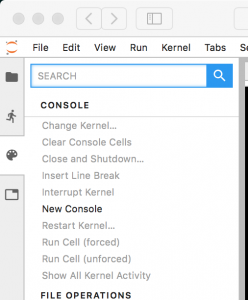
If you need to clear the code console without restarting the kernel, you can right click on the console itself and select “Clear Console Cells”.
Terminals
The JupyterLab project continues its support of system shells in the browser. For Mac / Linux, it supports bash, tsch, etc while on Windows, it supports Powershell. These terminals can run anything that you would normally run from your system’s terminal, including other programs like vim or emacs. Do note that the JupyterLab terminals run on the system that you have JupyterLab installed to, so it will be using your user’s privileges as well.
Anyway, if you would like to see a terminal in action, just start up the Launcher by pressing the “+” button in the File Browser. Then select the Terminal:
If you close the terminal tab, JupyterLab will leave it running in the background. Here is a terminal running:

If you would like to re-open your terminal, just go to the Running tab:
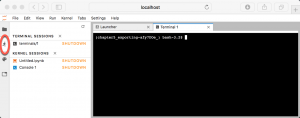
Then select the terminal from the list of running applications.
The Command Palette
The user actions in JupyterLab all go through a central command system. This includes the commands used by the menu bar, context menus, keyboard shortcuts and more. You can access the available commands via the Command Palette, which you will find under the Commands tab:
Here you can search for commands and execute them directly instead of hunting for them in the menu system. You can also bring up the Command Palette with the following keyboard shortcut: Command/Ctrl Shift C
Supported File Types
JupyterLab supports quite a few filetypes that it can display or allow you to edit. This allows you to layout rich cell output in a Notebook or Code Console. For files, JupyterLab will detect the data format by looking at the extension of the file or the entire filename if the extensions does not exist. Note that multiple editors / viewers can be associated with a single file type. For example, you can edit a Markdown file and view it as HTML. Just right-click a file and go to the Open With context menu item to view the editors and viewers that are available to you for that file type:

You can use Python code to display different data formats in your Notebook or Code Console. Here is an example:
from IPython.display import display, HTML
display(HTML('Hello from JupyterLab
'))
When you run this code in a Notebook, it should look like this:

For a full list of file types that are supported by JupyterLab, I recommend checking out the documentation. This should always be up-to-date and more useful then if I were to list out the items myself.
A Word on Extensions
As you might expect, JupyterLab supports extensions and was designed with extensibility in mind. Extensions can customize the user’s experience or enhance one or more parts of JupyterLab. For example, you could add new items to the menu or command palette or add some new keyboard shortcuts. JupyterLab itself is actually a collection of extensions.
If you want to create an extension for JupyterLab, then you will need to be familiar with Javascript or be willing to learn. The extensions need to be in the npm packaging format. To install pre-made extensions, you are required to have Node.js installed on your machine. Be sure to check out their website for proper installation instructions for your operating system.
Installing / Uninstalling Extensions
Once you have Node.js installed, then you can install an extension to JupyterLab by running the following command:
jupyter labextension install the-extension-name
If you require a specific version of the extension, then the command would look like this:
jupyter labextension install the-extension-name@1.2
Where “1.2” is the version you require. You can also extensions that are gzipped tarballs or a URL to a gzipped tarball.
To get a list of currently installed JupyterLab extensions, just run
jupyter labextension list
In the event that you want to uninstall an extension, you can easily do so like this:
jupyter labextension uninstall the-extension-name
You may also install or uninstall multiple extensions by listing the names of the packages after the install or uninstall command. Since JupyterLab rebuilds after each installation, this can take quite a while. To speed things up a bit when installing or uninstalling multiple extensions, you can include the **–no-build** flag. Then once the installation or uninstall is complete, you will need to run the build command yourself, like this:
jupyter lab build
Disabling Extensions
If you don’t want to uninstall an extension but you would like to disable it, that is easy to do too. Just run the disable command:
jupyter labextension disable the-extension-name
Then when you want to re-enable it, you can run the enable command:
jupyter labextension enable the-extension-name
Wrapping Up
The JupyterLab package is really amazing. You can do a lot more with it than you could with just a Jupyter Notebook. However the user interface is also more complex so the learning curve will be a bit steeper. However I think it is worth learning how to use it as the ability to edit documents and view them live is really helpful when creating a presentation or doing other types of work. At the very least, I would give it a try in a virtual environment to see whether or not it will fit your workflow.
Related Reading
- JupyterLab on Github
- Working with Jupyter Notebook Widgets
- Jupyter Notebook Debugging
Pingback: Links 6/2/2019: Vivaldi Browser 2.3, Wine Staging 4.1, IPFire 2.21, Snapcraft 3.1 | Techrights
Pingback: Getting Started with JupyterLab - 艾德资讯网