
Coverage.py is a 3rd party tool for Python that is used for measuring your code coverage. It was originally created by Ned Batchelder. The term “coverage” in programming circles is typically used to describe the effectiveness of your tests and how much of your code is actually covered by tests. You can use coverage.py with Python 2.6 up to the current version of Python 3 as well as with PyPy.
pip install coverage
Now that we have coverage.py installed, we need some code to use it with. Let’s create a module that we’ll call mymath.py Here’s the code:
def add(a, b):
    return a + b


def subtract(a, b):
    return a - b


def multiply(a, b):
    return a * b


def divide(numerator, denominator):
    return float(numerator) / denominator
Now we need a test. Let’s create one that tests the add function. Let’s give our test the following name: test_mymath.py. Go ahead and save it in the same location as you did for the previous module. Then add the following code to our test:
# test_mymath.py
import mymath
import unittest

class TestAdd(unittest.TestCase):
    """
    Test the add function from the mymath library
    """

    def test_add_integers(self):
        """
        Test that the addition of two integers returns the correct total
        """
        result = mymath.add(1, 2)
        self.assertEqual(result, 3)

    def test_add_floats(self):
        """
        Test that the addition of two floats returns the correct result
        """
        result = mymath.add(10.5, 2)
        self.assertEqual(result, 12.5)

    def test_add_strings(self):
        """
        Test the addition of two strings returns the two string as one
        concatenated string
        """
        result = mymath.add('abc', 'def')
        self.assertEqual(result, 'abcdef')


if __name__ == '__main__':
    unittest.main()
Now that we have all the pieces, we can run coverage.py using the test. Open up a terminal and navigate to the folder that contains the mymath module and the test code we wrote. Now we can call coverage.py like this:
coverage run test_mymath.py
Note that we need to call run to get coverage.py to run the module. If your module accepts arguments, you can pass those in as you normally would. When you do this, you will see the test’s output as if you ran it yourself. You will also find a new file in the directory that is called .coverage (note the period at the beginning). To get information out of this file, you will need to run the following command:
coverage report -m
Executing this command will result in the following output:
Name             Stmts   Miss  Cover   Missing
----------------------------------------------
mymath.py            9      3    67%   9, 13, 17
test_mymath.py      14      0   100%
----------------------------------------------
TOTAL
The -m flag tells coverage.py that you want it to include the Missing column in the output. If you omit the -m, then you’ll only get the first four columns. What you see here is that coverage ran the test code and determined that I have only 67% of the mymath module covered by my unit test. The “Missing” column tells me what lines of code still need coverage. If you look at the lines coverage.py points out, you will quickly see that my test code doesn’t test the subtract, multiply or divide functions.
Before we try to add more test coverage, let’s learn how to make coverage.py produce an HTML report. To do this, all you need to do is run the following command:
coverage html
This command will create a folder named htmlcov that contains various files. Navigate into that folder and try opening index.html in your browser of choice. On my machine, it loaded a page like this:

You can actually click on the modules listed to load up an annotated web page that shows you what parts of the code are not covered. Since the mymath.py module obviously isn’t covered very well, let’s click on that one. You should end up seeing something like the following:
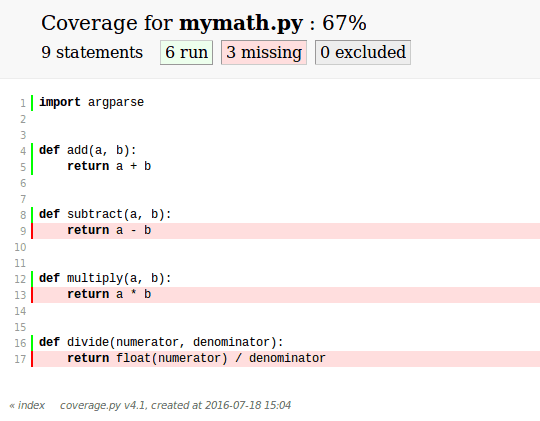
This screenshot clearly shows what parts of the code were not covered in our original unit test. Now that we know definitively what’s missing in our test coverage, let’s add a unit test for our subtract function and see how that changes things!
Open up your copy of test_mymath.py and add the following class to it:
class TestSubtract(unittest.TestCase):
    """
    Test the subtract function from the mymath library
    """

    def test_subtract_integers(self):
        """
        Test that subtracting integers returns the correct result
        """
        result = mymath.subtract(10, 8)
        self.assertEqual(result, 2)
Now we need to re-run coverage against the updated test. All you need to do is re-run this command: coverage run test_mymath.py. The output will show that four tests have passed successfully. Now re-run coverage html and re-open the “index.html” file. You should now see the that we’re at 78% coverage:
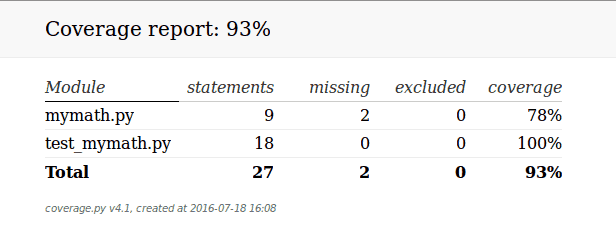
This is an 11% improvement! Let’s go ahead and add a simple test for the multiply and divide functions and see if we can hit 100% coverage!
class TestMultiply(unittest.TestCase):
    """
    Test the multiply function from the mymath library
    """

    def test_subtract_integers(self):
        """
        Test that multiplying integers returns the correct result
        """
        result = mymath.multiply(5, 50)
        self.assertEqual(result, 250)


class TestDivide(unittest.TestCase):
    """
    Test the divide function from the mymath library
    """

    def test_divide_by_zero(self):
        """
        Test that multiplying integers returns the correct result
        """
        with self.assertRaises(ZeroDivisionError):
            result = mymath.divide(8, 0)
Now you can re-run the same commands as before and reload the “index.html” file. When you do, you should see something like the following:

As you can see, we have hit full test coverage! Of course, full coverage in this case means that each function is exercised by our test suite. The problem with this is that we have three times the number of tests for the addition function versus the others, but coverage.py doesn’t give us any kind of data about that. However it will give us a good idea of basic coverage even if it can’t tell us if we’ve tested every possible argument permutation imaginable.
Additional Information
I just wanted to mention a few other features of coverage.py without going into a lot of detail. First, coverage.py supports configuration files. The configuration file format is your classic “.ini” file with sections demarcated by the fact that they are surrounded with square braces (i.e. [my_section]). You can add comments to the config file using the following # or ; (semi-colon).
Coverage.py also allows you to specify what source files you want it to analyze via the configuration file we mentioned previously. Once you have the configuration set up the way you want it, then you can run coverage.py. It also supports a “–source” command-line switch. Finally you can use the “–include” and “–omit” switches to include a list of file name patterns or exclude them. These switches have matching configuration values that you can add to your configuration file too.
The last item that I want to mention is that coverage.py supports plugins. You can write your own or download and install someone else’s plugin to enhance coverage.py.
Wrapping Up
You now know the basics of coverage.py and what this special package is useful for. Coverage.py allows you to check your tests and find holes in your test coverage. If you aren’t sure you’ve got your code tested properly, this package will help you ascertain where the holes are if they exist. Of course, you are still responsible for writing good tests. If your tests aren’t valid but they pass anyway, coverage.py won’t help you.
Very nice and easy to use!!
Pingback: CS373 Fall 2018: Supawit Chockchowwat – S. Chockchowwat