
The Portable Document Format (PDF) is a well-known format popularized by Adobe. It purports to create a document that should render the same across platforms.
Python has several libraries that you can use to work with PDFs:
- ReportLab – Creating PDFs
- PyPDF2 – Manipulating preexisting PDFs
- pdfrw – Also for manipulating preexisting PDFs, but also works with ReportLab
- PDFMiner – Extracts text from PDFs
There are several more Python PDF-related packages, but those four are probably the most well known. One common task of working with PDFs is the need for merging or concatenating multiple PDFs into one PDF. Another common task is taking a PDF and splitting out one or more of its pages into a new PDF.
You will be creating a graphical user interface that does both of these tasks using PyPDF2.
 |
This tutorial is from my book, Creating GUI Applications with wxPython. You can get it here: Creating GUI Applications with wxPython |
The full code for this tutorial can be found on Github in the chapter 10 folder.
Installing PyPDF2
The PyPDF2 package can be installed using pip:
pip install pypdf2
This package is pretty small, so the installation should be quite quick.
Now that PyPDF2 is installed, you can design your UI!
Designing the Interface
This application is basically two programs contained in one window. You need a way of displaying a merging application and a splitting application. Having an easy way to switch between the two would be nice. You can design your own panel swapping code or you can use one of wxPython’s many notebook widgets.
To keep things simpler, let’s use a wx.Notebook for this application.
Here is a mockup of the merging tab:
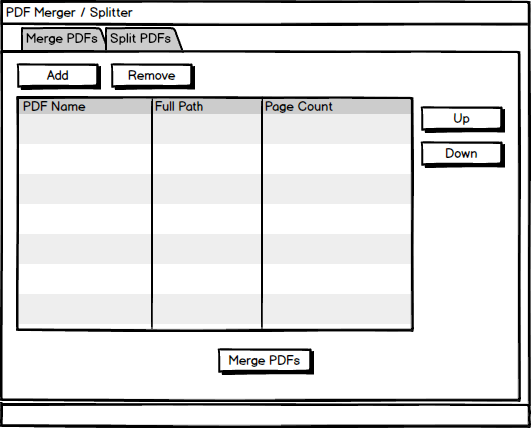
You will be loading up PDF files into a list control type widget. You also want a way to re-order the PDFs. And you need a way to remove items from the list. This mockup shows all the pieces you need to accomplish those goals.
Next is a mockup of the splitting tab:
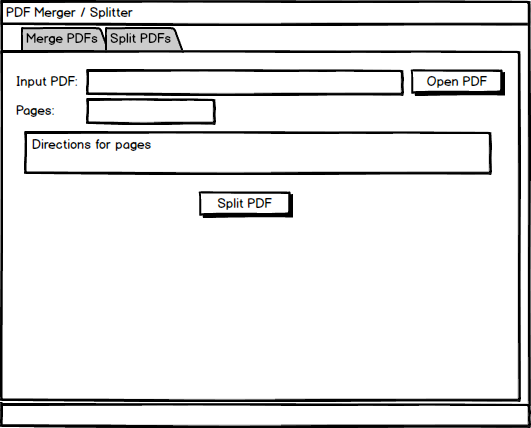
Basically what you want is a tool that shows what the input PDF is and what page(s) are to be split off. The user interface for this is pretty plain, but it should work for your needs.
Now let’s create this application!
Creating the Application
Let’s put some thought into your code’s organization. Each tab should probably be in its own module. You should also have a main entry point to run your application. That means you can reasonably have at least three Python files.
Here is what you will be creating:
- The main module
- The merge panel module
- The split panel module
Let’s start with the main module!
The Main Module
As the main entry point of your application, the main module has a lot of responsibility. It will hold your other panels and could be a hub between the panels should they need to communicate. Most of the time, you would use pubsub for that though.
Let’s go ahead and write your first version of the code:
# main.py

import wx

from merge_panel import MergePanel
from split_panel import SplitPanel
The imports for the main module are nice and short. All you need is wx, the MergePanel and the SplitPanel. The latter two are ones that you will write soon.
Let’s go ahead and write the MainPanel code though:
class MainPanel(wx.Panel):

    def __init__(self, parent):
        super().__init__(parent)

        main_sizer = wx.BoxSizer(wx.VERTICAL)
        notebook = wx.Notebook(self)
        merge_tab = MergePanel(notebook)
        notebook.AddPage(merge_tab, 'Merge PDFs')
        split_tab = SplitPanel(notebook)
        notebook.AddPage(split_tab, 'Split PDFs')
        main_sizer.Add(notebook, 1, wx.ALL | wx.EXPAND, 5)
        self.SetSizer(main_sizer)
The MainPanel is where all the action is. Here you instantiate a wx.Notebook and add the MergePanel and the SplitPanel to it. Then you add the notebook to the sizer and you’re done!
Here’s the frame code that you will need to add:
class MainFrame(wx.Frame):

    def __init__(self):
        super().__init__(None, title='PDF Merger / Splitter',
                         size=(800, 600))
        self.panel = MainPanel(self)
        self.Show()

if __name__ == '__main__':
    app = wx.App(False)
    frame = MainFrame()
    app.MainLoop()
As usual, you construct your frame, add a panel and show it to the user. You also set the size of the frame. You might want to experiment with the initial size as it may be too big or too small for your setup.
Now let’s move on and learn how to merge PDFs!
The merge_panel Module
The merge_panel module contains all the code you need for creating a user interface around merging PDF files. The user interface for merging is a bit more involved than it is for splitting.
Let’s get started!
# merge_panel.py

import os
import glob
import wx

from ObjectListView import ObjectListView, ColumnDefn
from PyPDF2 import PdfFileReader, PdfFileWriter

wildcard = "PDFs (*.pdf)|*.pdf"
Here you need to import Python’s os module for some path-related activities and the glob module for searching duty. You will also need ObjectListView for displaying PDF information and PyPDF2 for merging the PDFs together.
The last item here is the wildcard which is used when adding files to be merged as well as when you save the merged file.
To make the UI more friendly, you should add drag-and-drop support:
class DropTarget(wx.FileDropTarget):

    def __init__(self, window):
        super().__init__()
        self.window = window

    def OnDropFiles(self, x, y, filenames):
        self.window.update_on_drop(filenames)
        return True
You may recognize this code from the Archiver chapter. In fact, it’s pretty much unchanged. You still need to subclass wx.FileDropTarget and pass it the widget that you want to add drag-and-drop support to. You also need to override OnDropFile() to have it call a method using the widget you passed in. For this example, you are passing in the panel object itself.
You will also need to create a class for holding information about the PDFs. This class will be used by your ObjectListView widget.
Here it is:
class Pdf:

    def __init__(self, pdf_path):
        self.full_path = pdf_path
        self.filename = os.path.basename(pdf_path)
        try:
            with open(pdf_path, 'rb') as f:
                pdf = PdfFileReader(f)
                number_of_pages = pdf.getNumPages()
        except:
            number_of_pages = 0
        self.number_of_pages = str(number_of_pages)
The __init__() is nice and short this time around. You set up a list of pdfs for holding the PDF objects to be merged. You also instantiate and add the DropTarget to the panel. Then you create the main_sizer and call create_ui(), which will add all the widgets you need.
Speaking of which, let’s add create_ui() next:
def create_ui(self):
    btn_sizer = wx.BoxSizer()
    add_btn = wx.Button(self, label='Add')
    add_btn.Bind(wx.EVT_BUTTON, self.on_add_file)
    btn_sizer.Add(add_btn, 0, wx.ALL, 5)
    remove_btn = wx.Button(self, label='Remove')
    remove_btn.Bind(wx.EVT_BUTTON, self.on_remove)
    btn_sizer.Add(remove_btn, 0, wx.ALL, 5)
    self.main_sizer.Add(btn_sizer)
The create_ui() method is a bit long. The code will be broken up to make it easier to digest. The code above will add two buttons:
- An Add file button
- A Remove file button
These buttons go inside of a horizontally-oriented sizer along the top of the merge panel. You also bind each of these buttons to their own event handlers.
Now let’s add the widget for displaying PDFs to be merged:
    move_btn_sizer = wx.BoxSizer(wx.VERTICAL)
    row_sizer = wx.BoxSizer()

    self.pdf_olv = ObjectListView(
        self, style=wx.LC_REPORT | wx.SUNKEN_BORDER)
    self.pdf_olv.SetEmptyListMsg("No PDFs Loaded")
    self.update_pdfs()
    row_sizer.Add(self.pdf_olv, 1, wx.ALL | wx.EXPAND)
Here you add the ObjectListView widget to the row_sizer and call update_pdfs() to update it so that it has column labels.
You need to add support for reordering the PDFs in the ObjectListView widget, so let’s add that next:
    move_up_btn = wx.Button(self, label='Up')
    move_up_btn.Bind(wx.EVT_BUTTON, self.on_move)
    move_btn_sizer.Add(move_up_btn, 0, wx.ALL, 5)
    move_down_btn = wx.Button(self, label='Down')
    move_down_btn.Bind(wx.EVT_BUTTON, self.on_move)
    move_btn_sizer.Add(move_down_btn, 0, wx.ALL, 5)
    row_sizer.Add(move_btn_sizer)
    self.main_sizer.Add(row_sizer, 1, wx.ALL | wx.EXPAND, 5)
Here you add two more buttons. One for moving items up and one for moving items down. These two buttons are added to a vertically-oriented sizer, move_btn_sizer, which in turn is added to the row_sizer. Finally the row_sizer is added to the main_sizer.
Here’s the last few lines of the create_ui() method:
    merge_pdfs = wx.Button(self, label='Merge PDFs')
    merge_pdfs.Bind(wx.EVT_BUTTON, self.on_merge)
    self.main_sizer.Add(merge_pdfs, 0, wx.ALL | wx.CENTER, 5)

    self.SetSizer(self.main_sizer)
These last four lines add the merge button and get it hooked up to an event handler. It also sets the panel’s sizer to the main_sizer.
Now let’s create add_pdf():
def add_pdf(self, path):
    self.pdfs.append(Pdf(path))
You will be calling this method with a path to a PDF that you wish to merge with another PDF. This method will create an instance of the Pdf class and append it to the pdfs list.
Now you’re ready to create load_pdfs():
def load_pdfs(self, path):
    pdf_paths = glob.glob(path + '/*.pdf')
    for path in pdf_paths:
        self.add_pdf(path)
    self.update_pdfs()
This method takes in a folder rather than a file. It then uses glob to find all the PDFs in that folder. You will loop over the list of files that glob returns and use add_pdf() to add them to the pdfs list. Then you call update_pdfs() which will update the UI with the newly added PDF files.
Let’s find out what happens when you press the merge button:
def on_merge(self, event):
    """
    TODO - Move this into a thread
    """
    objects = self.pdf_olv.GetObjects()
    if len(objects) < 2:
        with wx.MessageDialog(
            None,
            message='You need 2 or more files to merge!',
            caption='Error',
            style= wx.ICON_INFORMATION) as dlg:
            dlg.ShowModal()
        return
    with wx.FileDialog(
        self, message="Choose a file",
        defaultDir='~',
        defaultFile="",
        wildcard=wildcard,
        style=wx.FD_SAVE | wx.FD_CHANGE_DIR
        ) as dlg:
        if dlg.ShowModal() == wx.ID_OK:
            path = dlg.GetPath()
    if path:
        _, ext = os.path.splitext(path)
        if '.pdf' not in ext.lower():
            path = f'{path}.pdf'
        self.merge(path)
The on_merge() method is the event handler that is called by your merge button. The docstring contains a TODO message to remind you to move the merging code to a thread. Technically the code you will be moving is actually in the merge() function, but as long as you have some kind of reminder, it doesn't matter all that much.
Anyway, you use GetObjects() to get all the PDFs in the ObjectListView widget. Then you check to make sure that there are at least two PDF files. If not, you will let the user know that they need to add more PDFs! Otherwise you will open up a wx.FileDialog and have the user choose the name and location for the merged PDF.
Finally you check if the user added the .pdf extension and add it if they did not. Then you call merge().
The merge() method is conveniently the next method you should create:
def merge(self, output_path):
    pdf_writer = PdfFileWriter()

    objects = self.pdf_olv.GetObjects()

    for obj in objects:
        pdf_reader = PdfFileReader(obj.full_path)
        for page in range(pdf_reader.getNumPages()):
            pdf_writer.addPage(pdf_reader.getPage(page))

    with open(output_path, 'wb') as fh:
        pdf_writer.write(fh)

    with wx.MessageDialog(None, message='Save completed!',
                          caption='Save Finished',
                         style= wx.ICON_INFORMATION) as dlg:
        dlg.ShowModal()
Here you create a PdfFileWriter() object for writing out the merged PDF. Then you get the list of objects from the ObjectListView widget rather than the pdfs list. This is because you can reorder the UI so the list may not be in the correct order. The next step is to loop over each of the objects and get its full path out. You will open the path using PdfFileReader and loop over all of its pages, adding each page to the pdf_writer.
Once all the PDFs and all their respective pages are added to the pdf_writer, you can write out the merged PDF to disk. Then you open up a wx.MessageDialog that lets the user know that the PDFs have merged.
While this is happening, you may notice that your UI is frozen. That is because it can take a while to read all those pages into memory and then write them out. This is the reason why this part of your code should be done in a thread. You will be learning about that refactor later on in this chapter.
Now let's create on_add_file():
def on_add_file(self, event):
    paths = None
    with wx.FileDialog(
        self, message="Choose a file",
        defaultDir='~',
        defaultFile="",
        wildcard=wildcard,
        style=wx.FD_OPEN | wx.FD_MULTIPLE
        ) as dlg:
        if dlg.ShowModal() == wx.ID_OK:
            paths = dlg.GetPaths()
    if paths:
        for path in paths:
            self.add_pdf(path)
        self.update_pdfs()
This code will open up a wx.FileDialog and let the user choose one or more files. Then it returns them as a list of paths. You can then loop over those paths and use add_path() to add them to the pdfs list.
Now let's find out how to reorder the items in the ObjectListView widget:
def on_move(self, event):
    btn = event.GetEventObject()
    label = btn.GetLabel()
    current_selection = self.pdf_olv.GetSelectedObject()
    data = self.pdf_olv.GetObjects()
    if current_selection:
        index = data.index(current_selection)
        new_index = self.get_new_index(
            label.lower(), index, data)
        data.insert(new_index, data.pop(index))
        self.pdfs = data
        self.update_pdfs()
        self.pdf_olv.Select(new_index)
Both the up and down buttons are bound to the on_move() event handler. You can get access to which button called this handler via event.GetEventObject(), which will return the button object. Then you can get the button's label. Next you need to get the current_selection and a list of the objects, which is assigned to data. Now you can use the index attribute of the list object to find the index of the current_selection.
Once you have that information, you pass the button label, the index and the data list to get_new_index() to calculate which direction the item should go. Once you have the new_index, you can insert it and remove the old index using the pop() method. Then reset the pdfs list to the data list so they match. The last two steps are to update the widget and re-select the item that you moved.
Let's take a look at how to get that new index now:
def get_new_index(self, direction, index, data):
    if direction == 'up':
        if index > 0:
            new_index = index - 1
        else:
            new_index = len(data)-1
    else:
        if index < len(data) - 1:
            new_index = index + 1
        else:
            new_index = 0
    return new_index
Here you use the button label, direction, to determine which way to move the item. If it's "up", then you check if the index is greater than zero and subtract one. If it is zero, then you take the entire length of the list and subtract one, which should move the item back to the other end of the list.
If you user hit the "down" button, then you check to see if the index is less than the length of the data minus one. In that case, you add one to it. Otherwise you set the new_index to zero.
The code is a bit confusing to look at, so feel free to add some print functions in there and then run the code to see how it works.
The next new thing to learn is how to remove an item:
def on_remove(self, event):
    current_selection = self.pdf_olv.GetSelectedObject()
    if current_selection:
        index = self.pdfs.index(current_selection)
        self.pdfs.pop(index)
        self.pdf_olv.RemoveObject(current_selection)
This method will get the current_selection, pop() it from the pdfs list and then use the RemoveObject() method to remove it from the ObjectListView widget.
Now let's take a look at the code that is called when you drag-and-drop items onto your application:
def update_on_drop(self, paths):
    for path in paths:
        _, ext = os.path.splitext(path)
        if os.path.isdir(path):
            self.load_pdfs(path)
        elif os.path.isfile(path) and ext.lower() == '.pdf':
            self.add_pdf(path)
            self.update_pdfs()
In this case, you loop over the paths and check to see if the path is a directory or a file. They could also be a link, but you will ignore those. If the path is a directory, then you call load_pdfs() with it. Otherwise you check to see if the file has an extension of .pdf and if it does, you call add_pdf() with it.
The last method to create is update_pdfs():
def update_pdfs(self):
    self.pdf_olv.SetColumns([
        ColumnDefn("PDF Name", "left", 200, "filename"),
        ColumnDefn("Full Path", "left", 250, "full_path"),
        ColumnDefn("Page Count", "left", 100, "number_of_pages")
    ])
    self.pdf_olv.SetObjects(self.pdfs)
This method adds or resets the column names and widths. It also adds the PDF list via SetObjects().
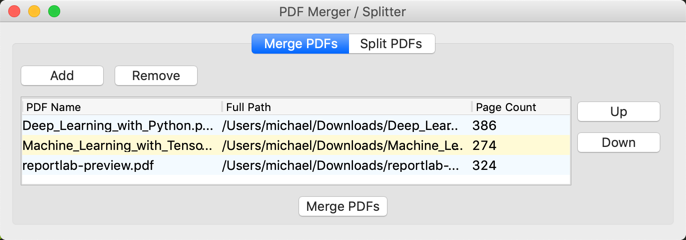
Here is what the merge panel looks like:
Now you are ready to create the split_panel!
The split_panel Module
The split_panel module is a bit simpler than the merge_panel was. You really only need a couple of text controls, some labels and a button.
Let's see how all of that ends up laying out:
# split_panel.py

import os
import string
import wx

from PyPDF2 import PdfFileReader, PdfFileWriter

wildcard = "PDFs (*.pdf)|*.pdf"
Here you import Python's os and string modules. You will also be needing PyPDF2 again and the wildcard variable will be useful for opening and saving PDFs.
You will also need the CharValidator class from the calculator chapter.
It is reproduced for you again here:
class CharValidator(wx.Validator):
    '''
    Validates data as it is entered into the text controls.
    '''

    def __init__(self, flag):
        wx.Validator.__init__(self)
        self.flag = flag
        self.Bind(wx.EVT_CHAR, self.OnChar)

    def Clone(self):
        '''Required Validator method'''
        return CharValidator(self.flag)

    def Validate(self, win):
        return True

    def TransferToWindow(self):
        return True

    def TransferFromWindow(self):
        return True

    def OnChar(self, event):
        keycode = int(event.GetKeyCode())
        if keycode < 256:
            key = chr(keycode)
            if self.flag == 'no-alpha' and key in string.ascii_letters:
                return
            if self.flag == 'no-digit' and key in string.digits:
                return
        event.Skip()
The CharValidator class is useful for validating that the user is not entering any letters into a text control. You will be using it for splitting options, which will allow the user to choose which pages they want to split out of the input PDF.
But before we get to that, let's create the SplitPanel:
class SplitPanel(wx.Panel):

    def __init__(self, parent):
        super().__init__(parent)
        font = wx.Font(12, wx.SWISS, wx.NORMAL, wx.NORMAL)
        main_sizer = wx.BoxSizer(wx.VERTICAL)
The first few lines of the __init__() create a wx.Font instance and the main_sizer.
Here's the next few lines of the __init__():
row_sizer = wx.BoxSizer()
lbl = wx.StaticText(self, label='Input PDF:')
lbl.SetFont(font)
row_sizer.Add(lbl, 0, wx.ALL | wx.CENTER, 5)
self.pdf_path = wx.TextCtrl(self, style=wx.TE_READONLY)
row_sizer.Add(self.pdf_path, 1, wx.EXPAND | wx.ALL, 5)
pdf_btn = wx.Button(self, label='Open PDF')
pdf_btn.Bind(wx.EVT_BUTTON, self.on_choose)
row_sizer.Add(pdf_btn, 0, wx.ALL, 5)
main_sizer.Add(row_sizer, 0, wx.EXPAND)
This bit of code adds a row of widgets that will be contained inside of row_sizer. Here you have a nice label, a text control for holding the input PDF path and the "Open PDF" button. After adding each of these to the row_sizer, you will then add that sizer to the main_sizer.
Now let's add a second row of widgets:
msg = 'Type page numbers and/or page ranges separated by commas.' \
    ' For example: 1, 3 or 4-10. Note you cannot use both commas ' \
    'and dashes.'
directions_txt = wx.TextCtrl(
    self, value=msg,
    style=wx.TE_MULTILINE | wx.NO_BORDER)
directions_txt.SetFont(font)
directions_txt.Disable()
main_sizer.Add(directions_txt, 0, wx.ALL | wx.EXPAND, 5)
These lines of code create a multi-line text control that has no border. It contains the directions of use for the pdf_split_options text control and appears beneath that widget as well. You also Disable() the directions_txt to prevent the user from changing the directions.
There are four more lines to add to the __init__():
split_btn = wx.Button(self, label='Split PDF')
split_btn.Bind(wx.EVT_BUTTON, self.on_split)
main_sizer.Add(split_btn, 0, wx.ALL | wx.CENTER, 5)
self.SetSizer(main_sizer)
These last few lines will add the "Split PDF" button, bind it to an event handler and add the button to a sizer. Then you set the sizer for the panel.
Now that you have the UI itself written, you need to start writing the other methods:
def on_choose(self, event):
    path = None
    with wx.FileDialog(
        self, message="Choose a file",
        defaultDir='~',
        defaultFile="",
        wildcard=wildcard,
        style=wx.FD_OPEN | wx.FD_CHANGE_DIR
        ) as dlg:
        if dlg.ShowModal() == wx.ID_OK:
            path = dlg.GetPath()
    if path:
        self.pdf_path.SetValue(path)
The on_choose() event handler is called when the user presses the "Open PDF" button. It will load a wx.FileDialog and if the user chooses a PDF, it will set the pdf_path text control with that user's choice.
Now let's get to the meat of the code:
def on_split(self, event):
    output_path = None
    input_pdf = self.pdf_path.GetValue()
    split_options = self.pdf_split_options.GetValue()
    if not input_pdf:
        message='You must choose an input PDF!'
        self.show_message(message)
        return
When the user presses the "Split PDF" button, on_split() is called. You will start off by checking if the user has chosen a PDF to split at all. If they haven't, tell them to do so using the show_message() method and return.
Next you need to check to see if the PDF path that the user chose still exists:
if not os.path.exists(input_pdf):
    message = f'Input PDF {input_pdf} does not exist!'
    self.show_message(message)
    return
If the PDF does not exist, let the user know of the error and don't do anything.
Now you need to check if the user put anything into split_options:
if not split_options:
    message = 'You need to choose what page(s) to split off'
    self.show_message(message)
    return
If the user didn't set the split_options then your application won't know what pages to split off. So tell the user.
The next check is to make sure the user does not have both commas and dashes:
if ',' in split_options and '-' in split_options:
    message = 'You cannot have both commas and dashes in options'
    self.show_message(message)
    return
You could theoretically support both commas and dashes, but that will make the code more complex. If you want to add that, feel free. For now, it is not supported.
Another item to check is if there is more than one dash:
if split_options.count('-') > 1:
    message = 'You can only use one dash'
    self.show_message(message)
    return
Users are tricky and it is easy to bump a button twice, so make sure to let the user know that this is not allowed.
The user could also enter a single negative number:
if '-' in split_options:
    page_begin, page_end = split_options.split('-')
    if not page_begin or not page_end:
        message = 'Need both a beginning and ending page'
        self.show_message(message)
        return
In that case, you can check to make sure it splits correctly or you can try to figure out where in the string the negative number is. In this case, you use the split method to figure it out.
The last check is to make sure that the user has entered a number and not just a dash or comma:
if not any(char.isdigit() for char in split_options):
    message = 'You need to enter a page number to split off'
    self.show_message(message)
    return
You can use Python's any builtin for this. You loop over all the characters in the string and ask them if they are a digit. If they aren't, then you show a message to the user.
Now you are ready to create the split PDF file itself:
with wx.FileDialog(
    self, message="Choose a file",
    defaultDir='~',
    defaultFile="",
    wildcard=wildcard,
    style=wx.FD_SAVE | wx.FD_CHANGE_DIR
    ) as dlg:
    if dlg.ShowModal() == wx.ID_OK:
        output_path = dlg.GetPath()
This bit of code will open the save version of the wx.FileDialog and let the user pick a name and location to save the split PDF.
The last piece of code for this function is below:
if output_path:
    _, ext = os.path.splitext(output_path)
    if '.pdf' not in ext.lower():
        output_path = f'{output_path}.pdf'
    split_options = split_options.strip()
    self.split(input_pdf, output_path, split_options)
Once you have the output_path, you will check to make sure the user added the .pdf extension. If they didn't, then you will add it for them. Then you will strip off any leading or ending white space in split_options and call split().
Now let's create the code used to actually split a PDF:
def split(self, input_pdf, output_path, split_options):
    pdf = PdfFileReader(input_pdf)
    pdf_writer = PdfFileWriter()
    if ',' in split_options:
        pages = [page for page in split_options.split(',')
                 if page]
        for page in pages:
            pdf_writer.addPage(pdf.getPage(int(page)))
    elif '-' in split_options:
        page_begin, page_end = split_options.split('-')
        page_begin = int(page_begin)
        page_end = int(page_end)
        page_begin = self.get_actual_beginning_page(page_begin)

        for page in range(page_begin, page_end):
            pdf_writer.addPage(pdf.getPage(page))
    else:
        # User only wants a single page
        page_begin = int(split_options)
        page_begin = self.get_actual_beginning_page(page_begin)
        pdf_writer.addPage(pdf.getPage(page_begin))
Here you create a PdfFileReader object called pdf and a PdfFileWriter object called pdf_writer. Then you check split_options to see if the user used commas or dashes. If the user went with a comma separated list, then you loop over the pages and add them to the writer.
If the user used dashes, then you need to get the beginning page and the ending page. Then you call the get_actual_beginning_page() method to do a bit of math because page one when using PyPDF is actually page zero. Once you have the normalized numbers figured out, you can loop over the range of pages using Python's range function and add the pages to the writer object.
The else statement is only used when the user enters a single page number that they want to split off. For example, they might just want page 2 out of a 20 page document.
The last step is to write the new PDF to disk:
# Write PDF to disk
with open(output_path, 'wb') as out:
    pdf_writer.write(out)

# Let user know that PDF is split
message = f'PDF split successfully to {output_path}'
self.show_message(message, caption='Split Finished',
                          style=wx.ICON_INFORMATION)
This code will create a new file using the path the user provided. Then it will write out the pages that were added to pdf_writer and display a dialog to the user letting them know that they now have a new PDF.
Let's take a quick look at the logic you need to add to the get_actual_beginning_page() method:
def get_actual_beginning_page(self, page_begin):
    if page_begin < 0 or page_begin == 1:
        page_begin = 0
    if page_begin > 1:
        # Take off by one error into account
        page_begin -= 1
    return page_begin
Here you take in the beginning page and check if the page number is zero, one or greater than one. Then you do a bit of math to avoid off-by-one errors and return the actual beginning page number.
Now let's create show_message():
def show_message(self, message, caption='Error', style=wx.ICON_ERROR):
    with wx.MessageDialog(None, message=message,
                          caption=caption,
                          style=style) as dlg:
        dlg.ShowModal()
This is a helpful function for wrapping the creation and destruction of a wx.MessageDialog. It accepts the following arguments:
- message
- caption
- style flag
Then it uses Python's with statement to create an instance of the dialog and show it to the user.
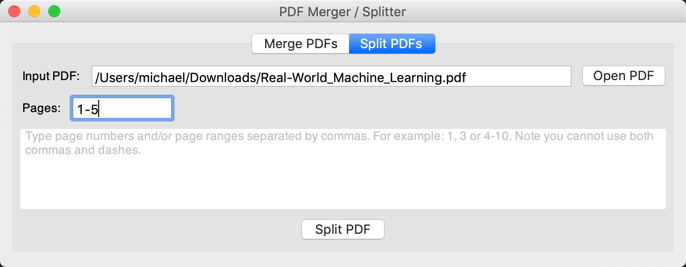
Here is what the split panel looks like when you are finished coding:
Now you are ready to learn about threads and wxPython!
Using Threads in wxPython
Every GUI toolkit handles threads differently. The wxPython GUI toolkit has three thread-safe methods that you should use if you want to use threads:
- wx.CallAfter
- wx.CallLater
- wx.PostEvent
You can use these methods to post information from the thread back to wxPython.
Let's update the merge_panel so that it uses threads!
Enhancing PDF Merging with Threads
Python comes with several concurrency-related modules. You will be using the threading module here. Take the original code and copy it into a new folder called version_2_threaded or refer to the pre-made folder in the Github repository for this chapter.
Let's start by updating the imports in merge_panel:
# merge_panel.py

import os
import glob
import wx

from ObjectListView import ObjectListView, ColumnDefn
from pubsub import pub
from PyPDF2 import PdfFileReader, PdfFileWriter
from threading import Thread

wildcard = "PDFs (*.pdf)|*.pdf"
The only differences here are this import line: from threading import Thread and the addition of pubsub. That gives us ability to subclass Thread.
Let's do that next:
class MergeThread(Thread):

    def __init__(self, objects, output_path):
        super().__init__()
        self.objects = objects
        self.output_path = output_path
        self.start()
The MergeThread class will take in the list of objects from the ObjectListView widget as well as the output_path. At the end of the __init__() you tell the thread to start(), which actually causes the run() method to execute.
Let's override that:
def run(self):
    pdf_writer = PdfFileWriter()
    page_count = 1

    for obj in self.objects:
        pdf_reader = PdfFileReader(obj.full_path)
        for page in range(pdf_reader.getNumPages()):
            pdf_writer.addPage(pdf_reader.getPage(page))
            wx.CallAfter(pub.sendMessage, 'update',
                         msg=page_count)
            page_count += 1

    # All pages are added, so write it to disk
    with open(self.output_path, 'wb') as fh:
        pdf_writer.write(fh)

    wx.CallAfter(pub.sendMessage, 'close')
Here you create a PdfFileWriter class and then loop over the various PDFs, extracting their pages and adding them to the writer object as you did before. After a page is added, you use wx.CallAfter to send a message using pubsub back to the GUI thread. In this message, you send along the current page count of added pages. This will update a dialog that has a progress bar on it.
After the file is finished writing out, you send another message via pubsub to tell the progress dialog to close.
Let's create a progress widget:
class MergeGauge(wx.Gauge):

    def __init__(self, parent, range):
        super().__init__(parent, range=range)

        pub.subscribe(self.update_progress, "update")

    def update_progress(self, msg):
        self.SetValue(msg)
To create a progress widget, you can use wxPython's wx.Gauge. In the code above, you subclass that widget and subscribe it to the update message. Whenever it receives an update, it will change the gauge's value accordingly.
You will need to put this gauge into a dialog, so let's create that next:
class MergeProgressDialog(wx.Dialog):

    def __init__(self, objects, path):
        super().__init__(None, title='Merging Progress')
        pub.subscribe(self.close, "close")

        sizer = wx.BoxSizer(wx.VERTICAL)
        lbl = wx.StaticText(self, label='Merging PDFS')
        sizer.Add(lbl, 0, wx.ALL | wx.CENTER, 5)
        total_page_count = sum([int(obj.number_of_pages)
                                for obj in objects])
        gauge = MergeGauge(self, total_page_count)
        sizer.Add(gauge, 0, wx.ALL | wx.EXPAND, 5)

        MergeThread(objects, output_path=path)
        self.SetSizer(sizer)

    def close(self):
        self.Close()
The MergeProgressDialog subscribes the dialog to the "close" message. It also adds a label and the gauge / progress bar to itself. Then it starts the MergeThread. When the "close" message gets emitted, the close() method is called and the dialog will be closed.
The other change you will need to make is in the MergePanel class, specifically the merge() method:
def merge(self, output_path, objects):
    with MergeProgressDialog(objects, output_path) as dlg:
        dlg.ShowModal()

    with wx.MessageDialog(None, message='Save completed!',
                          caption='Save Finished',
                         style= wx.ICON_INFORMATION) as dlg:
        dlg.ShowModal()
Here you update the method to accept the objects parameter and create the MergeProgressDialog with that and the output_path. Note that you will need to change on_merge() to pass in the objects list in addition to the path to make this work. Once the merge is finished, the dialog will automatically close and destroy itself. Then you will create the same wx.MessageDialog as before and show that to the user to let them know the merged PDF is ready.
You can use the code here to update the split_panel to use threads too if you would like to. This doesn't have to happen necessarily unless you think you will be splitting off dozens or hundreds of pages. Most of the time, it should be quick enough that the user wouldn't notice or care much when splitting the PDF.
Wrapping Up
Splitting and merging PDFs can be done using PyPDF2. You could also use pdfrw if you wanted to. There are plenty of ways to improve this application as well.
Here are a few examples:
- Put splitting into a thread
- Add toolbar buttons
- Add keyboard shortcuts
- Add a statusbar
However you learned a lot in this chapter. You learned how to merge and split PDFs. You also learned how to use threads with wxPython. Finally this code demonstrated adding some error handling to your inputs, specifically in the split_panel module.