TurboGears is one of several web frameworks for Python that are available. The most popular by far is Django. Where I work, we chose TurboGears because of its integration with SQLAlchemy which supports composite keys. At that time, Django did not support that feature and I am not sure if it does yet. Anyway, I develop almost exclusively on a Windows box and have found the TurboGears’ documentation on the subject a little confusing. So here’s how I do it.
Note: We’ll be using TurboGears 2.1 in this tutorial
Getting Started
We’re going to make sure Python is set up right first. Open a command window by going to Start –> Run and then typing “cmd” and pressing enter. Try typing “python” (without the quotes) in there and hitting your enter. If you see the Python shell, then we’re halfway there. If you don’t, then we need to modify some settings.
Modifying Your Path
On Windows, I have found that it helps a LOT to modify my Path settings by adding my Python path and the path to the Scripts folder to my Path. Here’s how you do it:
- Right-Click “My Computer” and choose Properties (Windows XP) or you may have to go digging in Control Panel on Windows 7 and do a “Show All Control Panel Items” from the path bar and look for System. You should see something like this:
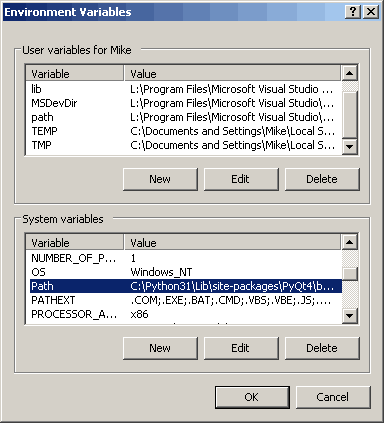
- Go to the Advanced tab and press the Environmental Variable button to see something like the following:
- You will see two types of variables here. In the bottom section are System Variables. Scroll down to the one labeled Path and at the end of that, add the following two lines: ;C:\Python26;C:\Python26\Scripts (adjust as necessary according to your version of Python and its location) Note that each entry is separated by a semi-colon, so make sure you do that too or this will not work!
Installing Prerequisites
Once that’s done, we need to make sure you have SetupTools installed. Go to the Python Package Index and download it if you know you don’t already have it as SetupTools will install a little script known as easy_install that will make getting TurboGears setup a breeze. Just scroll to the end of the page and pick the exe that corresponds to your Python version. You cannot install an egg unless you already have this installed, so I don’t know why they have eggs on there to begin with.
Once that’s done, open a new command window and try typing in the following: easy_install. You should receive an error like this: “error: No urls, filenames, or requirements specified (see –help)” If you do, then you’ve got it installed and on your path. Good job!
The TurboGears people recommend installing virtualenv to help keep your primary Python installation (PyPI) as pristine as possible. It also helps when you need to experiment with different versions of software that you don’t want to break current projects. How does this work? Well, virtualenv creates a little virtual workspace for you on your machine where it puts a copy of Python and installs all the software into that virtual place for you to play with. It’s a development sandbox! Since you now have easy_install, we’ll use that to install it. In your command window, type: easy_install virtualenv
That will cause easy_install to go out on the internet and try to download and install virtualenv from PyPI. It should look something like this:
If it completed successfully, then we’re ready to create a virtual environment for our TurboGears install. Change directories to a location that you’d like to do this in. On Windows 7, you’ll probably have security issues if you try to do this outside of your Documents or similar Collections folders, so you should stick with one of those. For this tutorial, we’ll create it in My Documents.
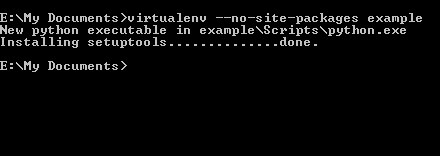
Once you’re there, type the following: virtualenv –no-site-packages example
This will create a folder that’s labeled “example” with several folders inside it. You should see the following on your screen:
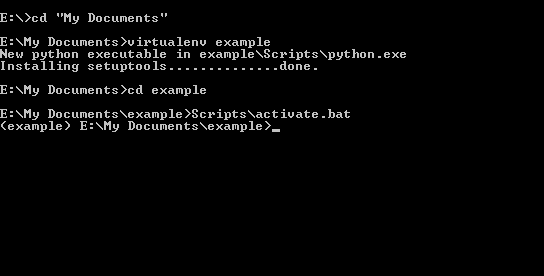
The –no-site-packages command will prevent the virtual environment from inheriting anything from the system Python’s site-packages folder. Now change directory into your example folder in the command window and type the following: Scripts\activate.bat (see screenshot below)
Installing & Setting Up TurboGears
Now your virtual environment is active and ready to rock. You can tell because each line is now prefixed with the name of the folder you’re in, which in this case is “example”. You can install Turbogears at this point as your virtual environment also has Setup Tools installed. However, this install is a little different as we will be specifying a specific URL. Type the following (you may want to check the TurboGears website to see if the URL has been updated since the writing of this post):
easy_install.exe -i http://www.turbogears.org/2.1/downloads/current/index tg.devtools
Depending on the speed of your PC and your connection, this will take a while. TurboGears is a mashup of a large number of 3rd party Python packages. You can watch it install or you can go get a drink or make a phone call while you wait. Once that’s finished, we’re nearly done.
Note: All the packages should be installing to your virtual space’s lib folder, NOT your default Python’s. If the latter is happening, you probably don’t have the virtual environment activated
Creating a TurboGears Workspace
One of the packages we installed earlier was Python Paste. TurboGears uses this package to bootstrap a new TurboGears application. So in your activated virtual environment, type the following command:
paster quickstart example
Note: If your path to the “example” folder has a space in it, you will receive an error about needing the PyWin32 library installed. Very annoying.
When you run this, you will need to answer 3 questions. The first is what to name the project. The default is the same name as the folder. Note that the project name has to be in lowercase. Then it asks if you’d like to use Mako templates. What it doesn’t say is that if you choose no (which is the default), you will get Genshi templates instead. That’s up to you. Mako looks and feels more “pythonic” from what I’ve seen of it, so I’d recommend it unless you already know Genshi or something like Genshi. The last question is whether or not you want authentication, which will give you a simple admin interface that you can login to, the default of which is “yes”. You can experiment with these or just take the defaults.
The next step is to change directories into your new project directory and then type the following in at the command line:
python setup.py develop
This adds your project to the virtual environment and also downloads a few packages to install alongside it that might be useful in your development. I don’t really know how these help you, but it seems to be a requirement of sorts according to TurboGear’s documentation.
The next to last step is to input the following into your command line window:
paster setup-app development.ini
This will initiate your database, which is basically just creating and populating with some default information for the security / authentication you agreed to. If you didn’t install that stuff or don’t want to run this step, you don’t have to. But you won’t be able to login unless you do.
Finally, you need to type the following:
paster serve development.ini
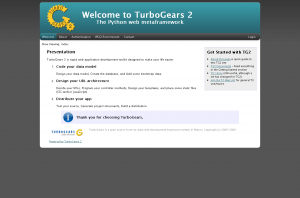
Now you will have a fully functioning website that’s running on http://localhost:8080/ (or http://127.0.0.1:8080) . If you load up your browser and navigate to that you should see something like this:
Wrapping Up
Now you should know how to install and setup a TurboGears web application. The sky’s the limit after all that work. You’ll need to start reading the documentation, add a dash of javascript and a bit of CSS and you’ll have a cool website in no time. Good luck and have fun!


> … we chose TurboGears because of its integration with SQLAlchemy which
supports composite keys. At that time, Django did not support that
feature and I am not sure if it does yet.
This has been an issue requested in Django since the project was young and it’s not yet resolved. See Django issue #373 for the details.
thanks for the tutorial and the links 😉 maybe change the color of link. didn’t notice the links at first
I can’t find development.ini file?